Loading...
Loading...
Loading...
Loading...
Loading...
Loading...
Loading...
Loading...
Loading...
Loading...
Loading...
Loading...
Loading...
Loading...
Loading...
Loading...
Loading...
Loading...
Loading...
Loading...
Loading...
Loading...
Loading...
Loading...
Loading...
Loading...
Loading...
Loading...
Loading...
Loading...
Loading...
Loading...
Loading...
Loading...
Loading...
Loading...
Loading...
Loading...
Loading...
Loading...
Loading...
Loading...
Loading...
Loading...
Loading...
Loading...
Welcome to Growify! This guide will walk you through the essential steps to get your Growify account set up and ready to deliver valuable insights for your business.
We've structured this phase to walk you through the key features that you need to know in order to succeed in using our platform.
Last Touch attribution tracks the final touchpoint before conversion.
Consider this scenario: a customer discovers your Meta page during social media research. A week later, they click on one of your Meta Ad, leading them to your website. While they haven't yet committed to a purchase, they are now familiar with your brand. After a week of contemplation, the customer searches for your brand name and proceeds to complete an online transaction. In this case, the branded search touchpoint (i.e., the customer using search terms to locate your website) receives 100% of the conversion credit.
The Power of Attribution Models: Unveiling the True Impact
An attribution model is a method used in marketing analytics to assign credit to different touchpoints along a customer's journey leading to a conversion or engagement with a brand Among these models lie four distinct methodologies, each offering unique perspectives into the customer journey: Linear, First Touch, Last Touch, and Non-Direct.

Pixel Connection is a powerful feature that allows you to connect your website’s pixel to Growify. With this feature, you can easily track your website visitors and their behavior, which will help you optimize your marketing strategies.
How Does Pixel Connection Work?
To use Pixel Connection, you simply need to connect your pixel to Growify. Once connected, you will be able to see real-time data on your website visitors, such as their behavior, location, and more. This data can be used to create targeted marketing campaigns and improve your overall marketing efforts.
Why Use Pixel Connection?
Using Pixel Connection is essential for any business that wants to optimize its marketing efforts. By tracking your website visitors and their behavior, you can create highly targeted marketing campaigns that are more likely to convert. Additionally, Pixel Connection allows you to track the ROI of your marketing efforts, which will help you identify areas for improvement and optimize your strategies over time.
Overall, Pixel Connection is a powerful tool that can help you take your marketing efforts to the next level. By connecting your website’s pixel to Growify, you can gain valuable insights into your visitors’ behavior, create targeted marketing campaigns, and optimize your overall marketing strategies for better results.
Connect your ad accounts with one click integrations. Make sure you’ve also installed UTM parameters to increase accuracy.
With a Linear attribution model, conversion credit is evenly distributed among all brand touchpoints.
For example, a customer discovers your brand on social media and subscribes to your mailing list. Subsequently, the customer directly visits your website and completes a successful $210 online purchase. In this scenario, there are three touchpoints. Each touchpoint receives an equal conversion credit of 33%, equating to a conversion value of $70 for each.
If you seek a straightforward method to illustrate the impact of your marketing channels, the Linear attribution model serves as a viable option. However, it entails assigning equal significance to all marketing channels. Consequently, this model may not necessarily lead to the most optimal marketing strategies.
Last Non-Direct attribution tracks the final single touchpoint before conversion, excluding any "direct" interactions occurring right before a customer converts.
Consider this example: a customer first discovers your brand by clicking on a TikTok Ad. Subsequently, they begin receiving newsletters and engage with them over a period. After some time, they bypass any direct interaction and directly visit your website, proceeding with a conversion. Instead of attributing the conversion credit to direct traffic (i.e., the customer directly visiting your website), the Last Non-Direct attribution model allocates this credit to the email marketing touchpoint.
The Last Non-Direct click model proves effective when customers tend to convert immediately upon directly visiting your website. By discerning which marketing channel influenced the conversion decision, you gain insight to optimize content and leverage this opportunity.


Your Attribution Insights Hub
Track attribution data and visualize trends across different channels. Effortlessly deep dive into individual campaign data.
How does Attribution Page work?
01. Choose Attribution Model
Growify helps you choose the right attribution model to assign credit to the touchpoints that lead to a customer’s conversion.
02. Explore Trends
Assess the effectiveness of individual channels and analyze attribution touchpoints to gain campaign insights.
03. Dive into Performance Data
View aggregated metrics across all campaigns and channels. Average values are displayed per campaign for easy viewing.
Full-Funnel Attribution Analysis
Delve into the Attribution Analysis page to understand why attribution data and customer touchpoints are vital. This tool empowers you to gauge your campaign performance effectively.
01 Chart Insights
The Attribution Analysis tool provides helpful charts to visualize your campaign trends.
You can also easily compare the effectiveness of different channels by viewing both channel data and Pixel Data.
02 Channel Attribution Summary
Gain a clear overview of each channel's performance, including essential metrics that you understand the effectiveness of your marketing efforts.
03 Deep Dive
Explore our enhanced table feature. This feature allows you to expand each channel to view separate data for individual platforms.
A granular view helps identify the most valuable channels driving conversions.
Monitor Creative Performance
Explore our Creative Page to learn more about tracking and optimizing your ad creatives.
How does the Creative Page Work?
01. Integrate Social Platforms
Integrate our platform with your marketing channels, CRM systems, and any other relevant data sources to ensure comprehensive data collection.
02. Review Creative Metrics
Growify allows you to view all creative metrics in one place, so you can understand their performance across all channels.
03. Scale your Creatives
You can scale your creatives based on performance insights. This ensures optimal allocation of resources and maximizes campaign effectiveness.
Full-Funnel Creatives Analysis
Unleash the full potential of your ads with our comprehensive tools designed to maximize performance and drive results.
01 Real-Time Creative Monitoring
Gain a comprehensive view of your creative performance across different advertising platforms and campaigns.
Easily compare the effectiveness of your visuals and copy across channels, ensuring consistent brand messaging.
02 Creative Vs. Copy Performance
Compare the performance of ad creatives versus copy to identify which elements drive better results.
This allows you to optimize your campaigns for maximum impact.
03 Creative Ranking Tools
Make informed decisions about your creative strategy with our powerful ranking tools.
Analyze key metrics such as click-through rates, conversion rates, and engagement levels to optimize your creative assets.
04 KPI & Creative Tracking
You can directly attribute conversions, engagements, and other important metrics to your creatives.
This allows you to optimize your creative strategy for maximum results.
Dashboard: The Hub for Key Metrics
Monitor, analyze, and optimize your marketing performance metrics all in one centralized dashboard.
How does the Dashboard Work?
01. Customize your Dashboard
Set up and customize metrics order for your specific needs. Drag-and-drop to move any metric and pin important items.
02. Monitor Data
Explore your data for actionable insights. This data give you a valuable understanding of your performance metrics to make informed decisions.
03. Optimize Marketing Efforts
This data can be used to create targeted marketing campaigns and improve your overall marketing efforts.
The Full Picture, In Real-Time, Anywhere
Discover how its features can enhance your performance, empower you to manage your data effectively, and propel your business growth.
01 Consolidated Metrics
Streamline the collection of vital business metrics, bringing them together in a single location.
Save valuable time by minimizing data management efforts and focus on utilizing the insights to fuel your business growth.
02 Comparative Creative Analysis
Our Comparative Creative Analysis feature allows you to gain insights into top-performing ad creatives and copy across all channels.
This allows you to optimize your campaigns effectively.
03 Product Comparisons
In the user-friendly product comparison feature, you can view your top-performing products side by side.
04 Fully Customizable Views
In the user-friendly product comparison feature, you can view your top-performing products side by side.
Getting started with your onboarding here.
Let's get you started by setting up your account. We'll guide you through connecting your platforms, setting up tracking, and customizing your workspace.
This offers in-depth insights into the customer journey and profiles. This section provides a comprehensive overview of how customers interact with your business, from initial engagement to conversion, and detailed customer profiles to help you understand their behavior and preferences.
Customer Journey: Learn how to track and analyze the steps your customers take throughout their journey, from discovery to purchase. Gain valuable insights to optimize marketing strategies and enhance customer experience.
Customer Profiles: Explore the key components of customer profiles, allowing you to segment your audience effectively. With Growify, you can understand individual customer characteristics, behaviors, and interactions to tailor your marketing efforts.
This page is a crucial resource for building a deeper understanding of your customers, enabling data-driven decisions to improve engagement and drive conversions.
Connect Integrations and UTMs
Connect your platform accounts to Growify, and if you’re prompted, please grant Growify the highest level of permissions requested for each platform. These connections are essential to give you a complete view of your advertising performance.
Growify has native integrations with:
Additional connections include:
First Touch attribution gives full credit to the initial interaction in a prospect’s journey before conversion, assigning 100% of the conversion credit to the first marketing channel a customer interacts with.
For example, if a customer initially discovers your business through Meta Ad, Meta Ads receives all credit for subsequent sales. Subsequent interactions, such as clicking on a Google Ad a week later and eventually visiting your website, do not affect this attribution. In the First Touch Attribution Model, Facebook Ads retains 100% of the conversion credit.
If your objective is to attract new top-of-the-funnel customers, the First Touch Attribution Model provides an effective means to assess the performance of each channel. It also serves as a valuable metric for determining which channels are most effective for brand awareness.
To accommodate extended sales cycles, you can select a lookback attribution window of your preference, typically ranging from 30 to 90 days. This attribution window ensures that when a prospect converts, credit is assigned solely to the first touch within the preceding 90 days, thereby considering relevance and recency.
Customer Journey Mapping Tools
Unlock the secrets of your customer’s journey. Use our mapping tools to enhance engagement, personalize experiences, and drive growth.
How Do Customer Journey Mapping Tools Work?
01. Data Integration
Connect your platforms with Growify's system to merge data from various marketing channels, providing an inclusive perspective
02. Monitor Visual Maps, Analyze Touchpoints
Growify's visual maps illustrate a customer's journey with your brand, starting from the first contact through to purchase and beyond. These tools assist in pinpointing touchpoints across different channels.
03. Optimize Marketing Efforts and Strategy
This data can be used to create targeted marketing campaigns and improve your overall marketing efforts.
How to Use Customer Journey Mapping Tools On Growify Software
This allows you to organize your data by brand, client, or project. Each workspace is an independent environment where you can manage ad channel integrations and view tailored analytics.
Key Features:
Unlimited Workspaces: Create as many workspaces as needed—perfect for managing multiple clients or brands.
Unlimited Ad Channels: Connect an unlimited number of ad channels of the same type (e.g., multiple Facebook Ad accounts) within each workspace.
Explore Customer Profiles
Elevate your marketing efforts with precision targeting and strategic segmentation. Explore Growify's customer profiling suite, craft strategies that resonate with your audience.
How Do Customer Profiles Work?
01. Analyze Data
Gather relevant customer information from various sources and utilize data points to understand customer preferences.
02. Segment Customers
Organize customers into distinct groups based on shared characteristics. You can customize marketing approaches to suit each segment's needs.
03. Refine Strategies
Tailor tactics according to customer profile insights to maximize engagement by aligning strategies with customer profiles
How to Utilize Customer Profiles
Discover how to harness the potential of customer profiles to enhance engagement. With this guide, you can unlock insights into customer behavior and preferences, enabling you to tailor your approach and drive impactful results.
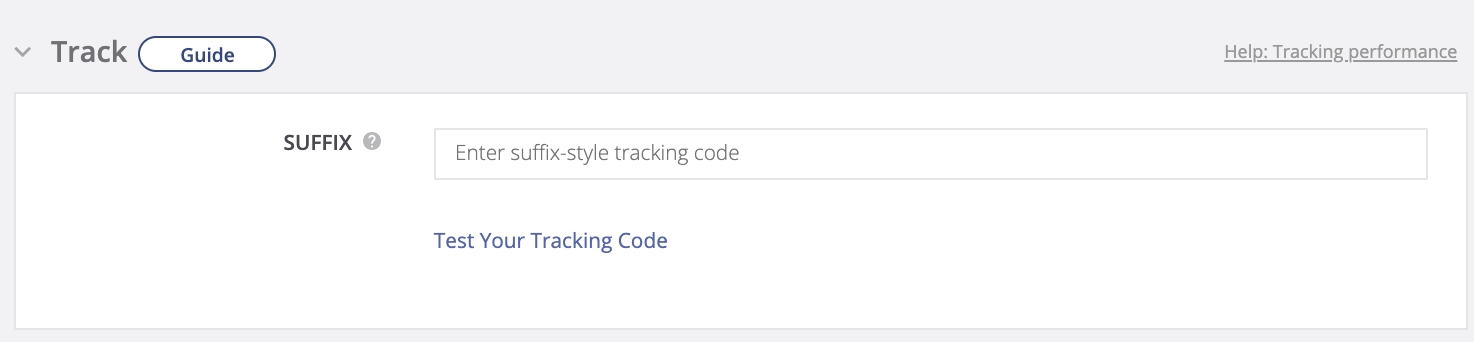
Growify enables you to track the performance of your Postscript ads using UTM parameters. This guide will walk you through how to properly set up tracking so you can measure Postscript impact across your customer journey inside Growify.
Select your Shop Name in the side menu of your PostScript dashboard, then select Tracking.
01 Initial Setup
Log in to your Growify account and navigate to the customer journey mapping section.
Start a new journey map and give it a descriptive name relevant to the campaign you're analyzing.
02 Define Customer Personas
Create or import customer personas. These should represent your typical customers, based on demographics, behaviors, and goals.
Assign personas to the journey map, so you can tailor it to specific customer groups.
03 Identify Key Touchpoints
List all possible touchpoints, such as social media, emails, website visits, or in-store experiences.
Add these touchpoints to the journey map in the order they typically occur.
04 Integrate Data
Connect various data sources to the mapping tool, like CRM systems, web analytics, and social media platforms.
This data will automatically populate the journey map, showing customer interactions at each touchpoint.
05 Analyze and Interpret Data
Examine the journey map to identify patterns, pain points, and moments of delight in the customer experience.
Look for areas where customers drop off or engage more deeply.
06 Customize The Customer Journey
Use insights from the map to make improvements. This could mean enhancing touchpoints, streamlining the path to purchase, or personalizing marketing messages.
Continuously update the journey map as you implement changes and gather more data.
07 Share Insights
Collaborate with your team by sharing the journey map insights. Discuss strategies to enhance the customer experience based on your findings.
Use workspaces to keep your analytics clean, focused, and scalable as your business grows.
01 Setup and Integration
Start by setting up your account on Growify.
Integrate the platform with your marketing channels, CRM systems, and any other relevant data sources to ensure efficient data collection.
02 Flexible Filter And Sorting
Utilize flexible filtering options to segment customers based on various criteria such as demographics, behavior, and purchase frequency.
Sort and prioritize customer profiles based on specific attributes or engagement levels to focus your efforts.
03 Analyze Customer Data
Examine customer profile data to identify trends and patterns in customer behavior.
Identify high-value customer segments and tailor marketing strategies to meet their needs effectively.
04 View Each Customer Profile
Monitor customer interactions across all touchpoints, from initial engagement to final conversion.
Ensure all channels, including digital ads, social media, email campaigns, and offline channels are included.
05 Continuous Review And Adjustment
Regularly review customer profile data to stay updated on evolving customer preferences and market trends.
Make necessary adjustments to segmentation criteria and strategies based on ongoing analysis.

Locate the Adjust Global UTM Parameters and make your desired changes.
Save any changes that you have made.
Need help? Visit our Product Documentation or Help Center or contact our support team.
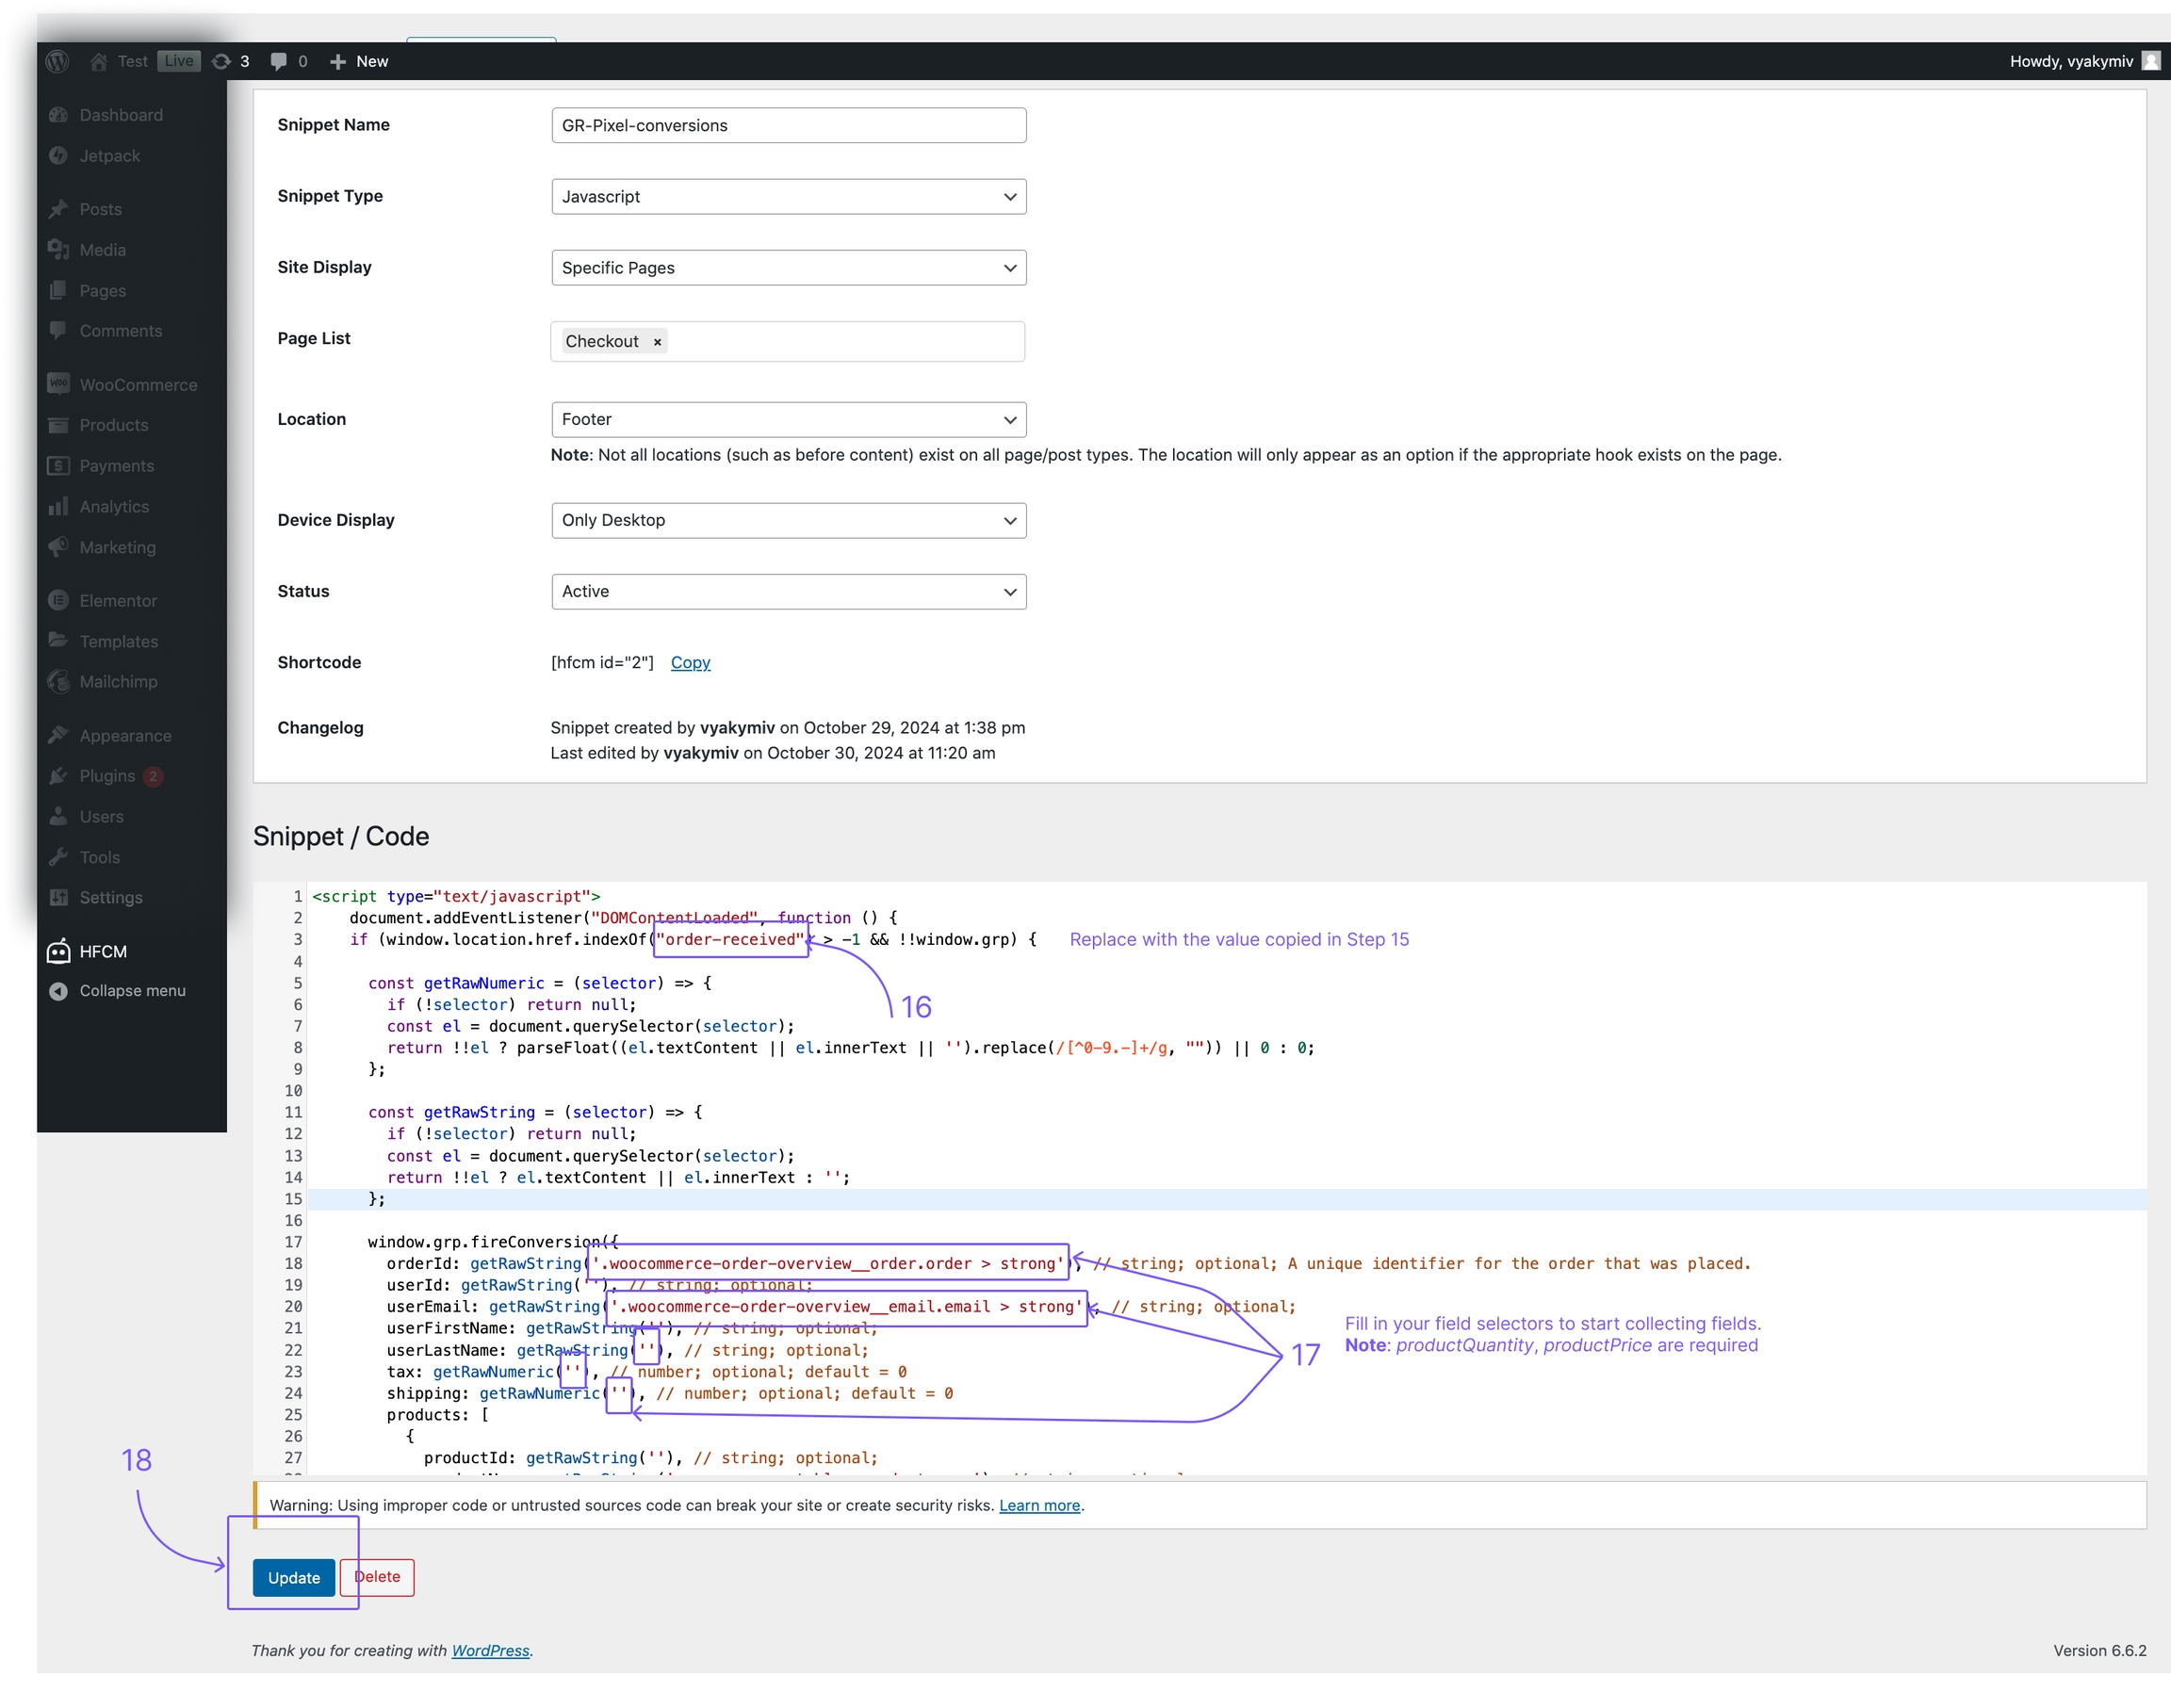
The Growify Pixel is a code snippet that enables us to gather behavioral data about your website visitors. The data feeds into our backend graph, allowing us to track customer journeys from site visit to purchase, along with marketing touchpoints in between.
Copy & paste the following script inside the tag on every page of your website.
Our generic script to track Conversion events from any checkout page.
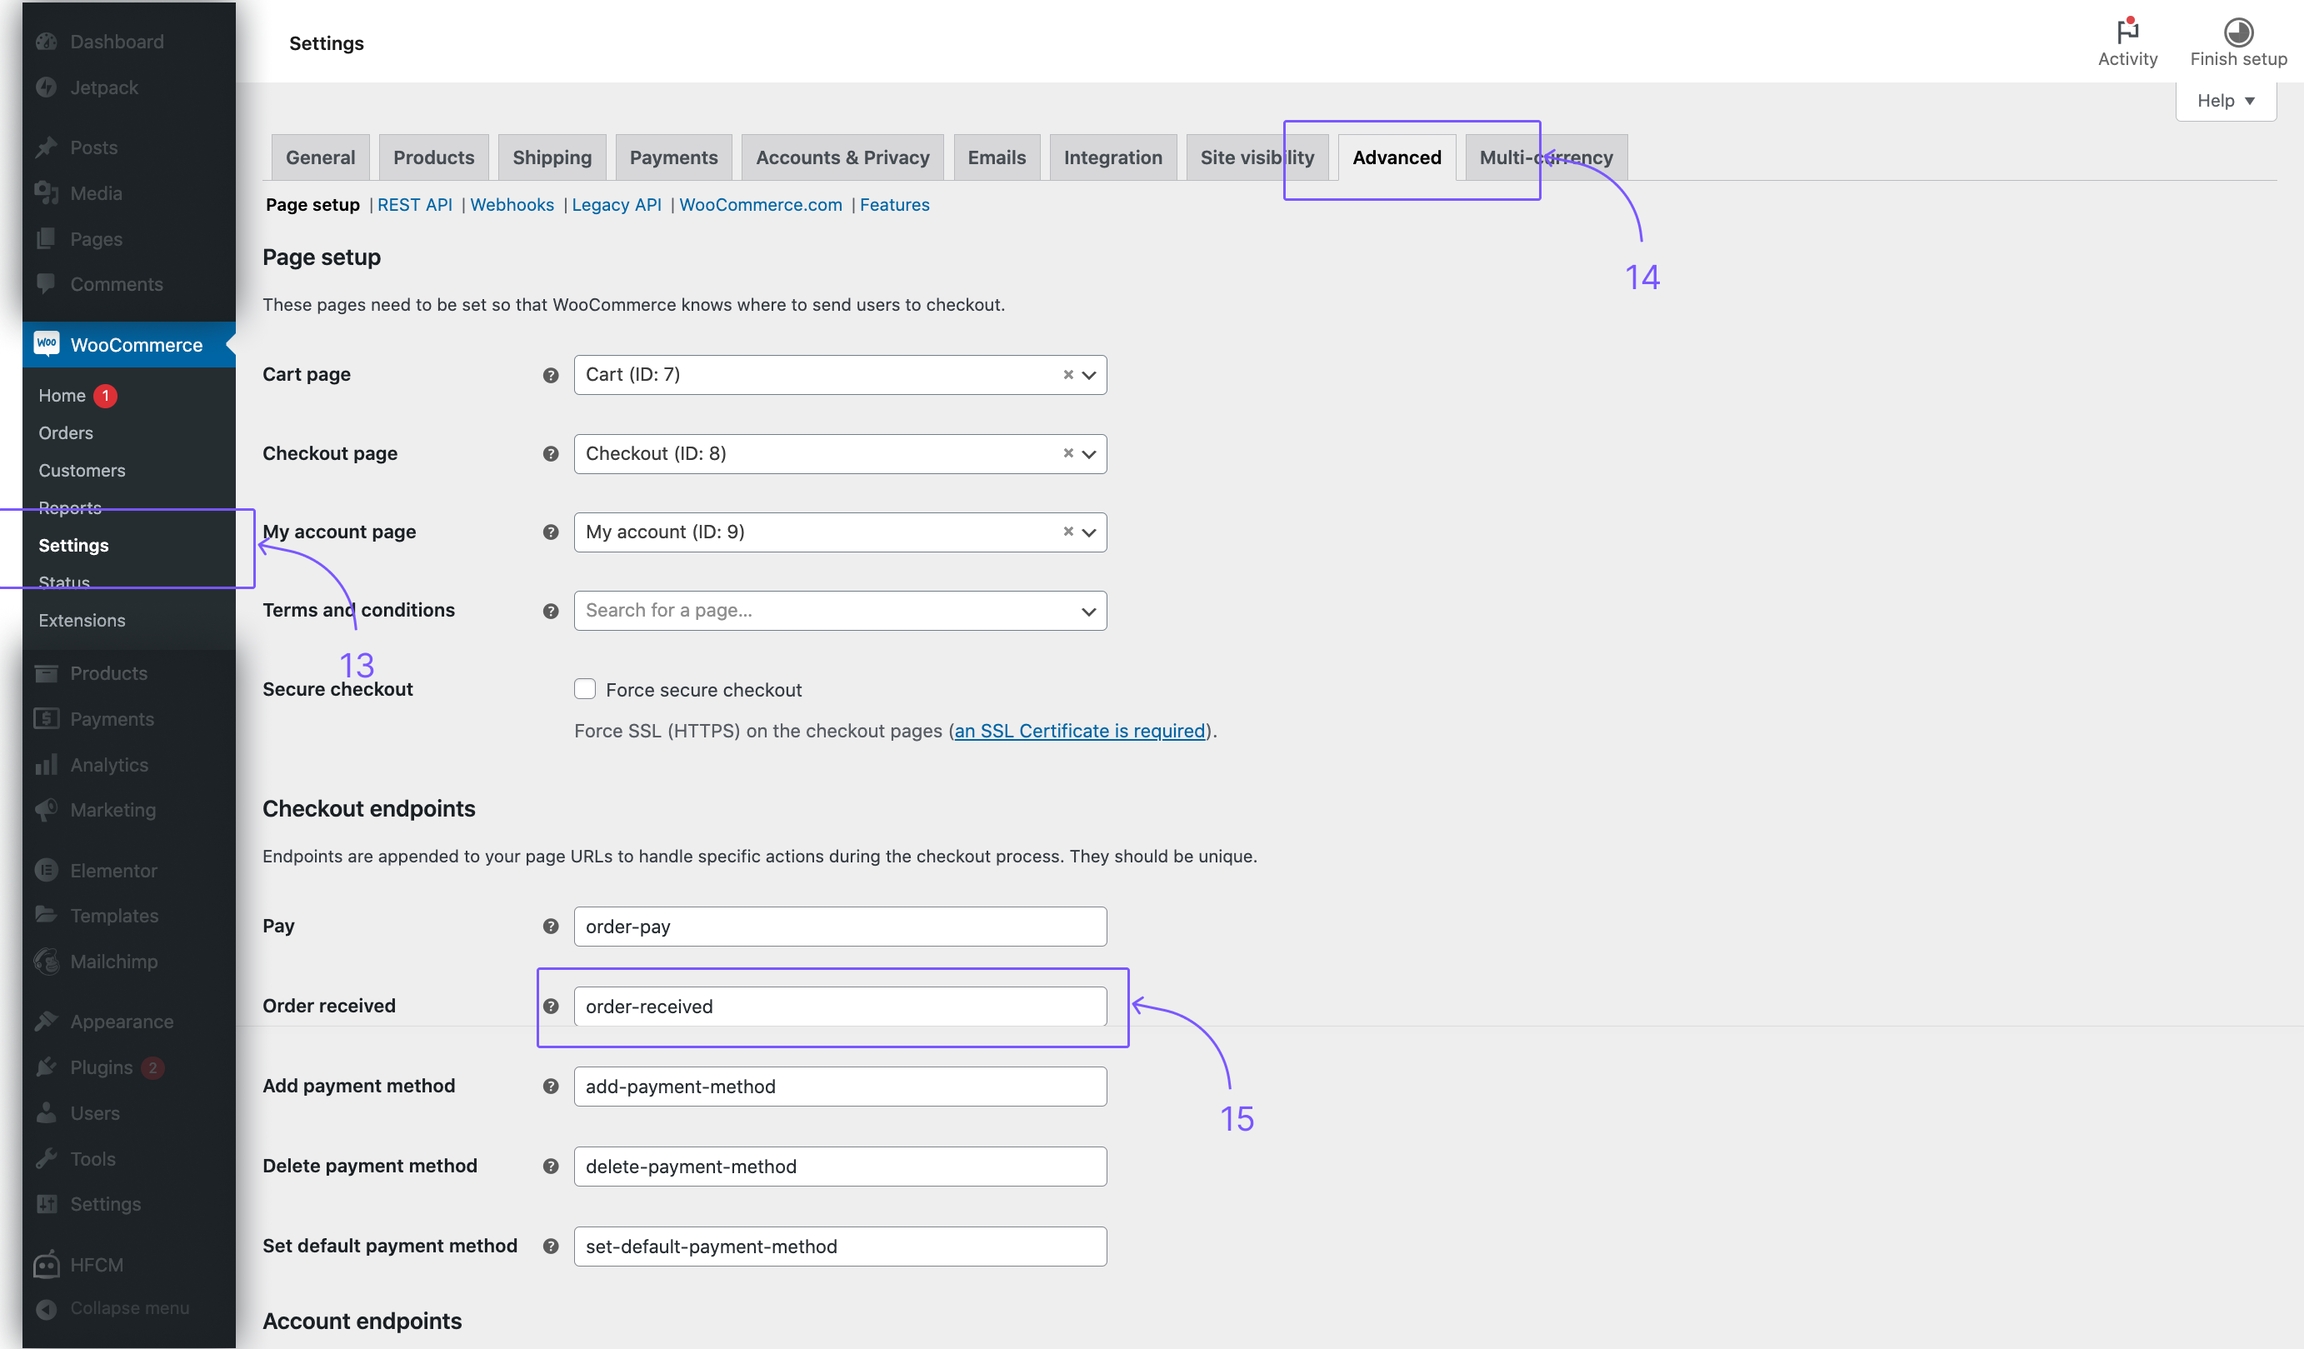
Please be sure it fires at the tail end of your customer journey — normally on your order confirmation page or thank you page.
It's recommended that somebody with basic Javascript knowledge sets up the script to decrease the likelihood of any issues.
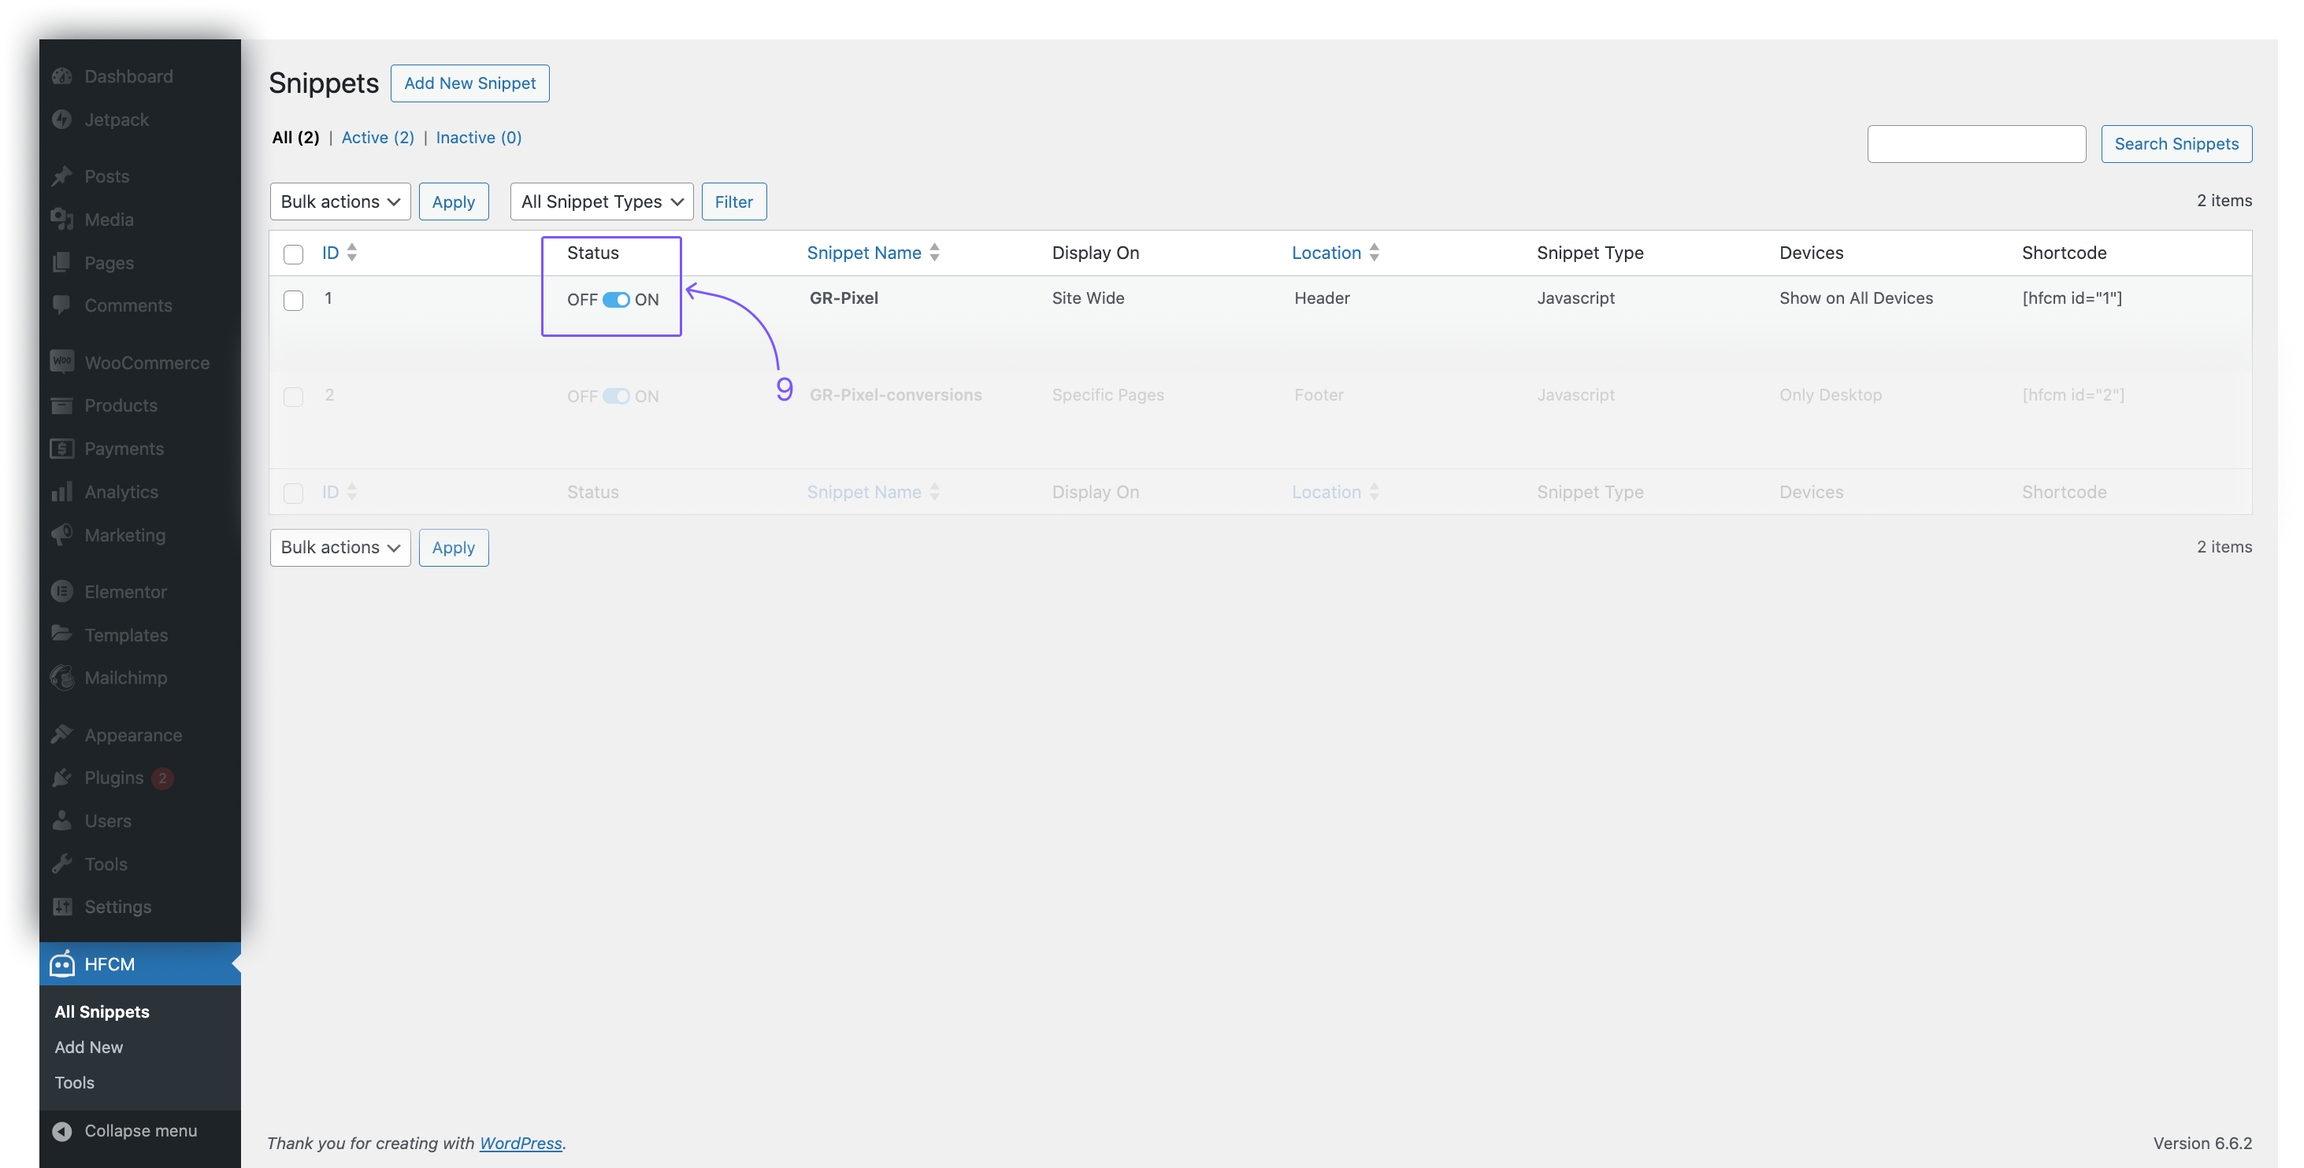
As soon as the Pixel is connected, Growify starts collecting events. To make sure that your fireConversion is triggering correctly, please check the Pixel status in the status bar ( last view and last purchase ).
Any misfires will cause a lack of tracking and attribution for any associated orders.
Any missing or incorrect historical pixel data cannot be recovered. That said, it’s extremely important that your fireConversion fires correctly from day one.
Growify offers a dashboard to verify your Pixel is triggering correctly. Go to the Integration tab in your Workspace to check the status.
Currency
The pixel assumes all incoming data uses the same currency as the Workspace currency.
Please ensure the currency setting in Shopify (or your platform) aligns with the one set in the Workspace.
Validation
Products: A few key products must be included in product array.
Product quantity: The orderId must be present and unique per transaction. If the id is missing or reused, that may be a signal of duplicate firing.
Product price: Total value should be greater than 0.
Sequence
Ensure the Growify Pixel is installed and triggered (Step 1) BEFORE firing the Conversion Event.
Growify enables you to track the performance of your Attentive Ads using UTM parameters. This guide will walk you through how to properly set up tracking so you can measure Attentive Ads impact across your customer journey inside Growify.
Table of UTM parameters
Here is a table with all UTM parameters that Growify will use to track all new and existing Attentive Ads.
UTM Key
UTM Value
Alternative UTM Key
Description
utm_source
attentive
Attentive Source Channel
Navigate to the Settings tab in your Attentive account.
Select Google Analytics from the menu.
Ensure the Enable Google Analytics Link Tracking toggle is switched on.
Input "attentive" in the UTM_Source field.
Input "text" in the UTM_Medium field.
For each campaign, click the URL button and input the unique UTM campaign name to identify the campaign.
Click Save to apply the settings.
Need help? Visit our or or contact our support team.
Growify enables you to track the performance of your Bing Ads using UTM parameters. This guide will walk you through how to properly set up tracking so you can measure Bing Ads impact across your customer journey inside Growify.
Table of UTM parameters
Here is a table with all UTM parameters that Growify will use to track all new and existing Bing Ads.
UTM Key
UTM Value
Alternative UTM Key
Description
gr_source
bing
utm_source
Bing Source Channel
Here is an example of a destination URL with the UTM parameters added:
From the navigation menu on the left, hover over Campaigns and select Settings > Account level options.
Under Auto-tagging of UTM, select the checkbox for Add UTM tags to my destination URLs.
Make sure the destination URL contains a utm_source=bing, if the utm_source is not equal to “bing”, please add a param &gr_source=bing at the end of your url. Add this for new and existing ads.
Select Save.
Growify will now track and analyze your Bing campaign performance. You can view insights directly in your Growify dashboard.
Need help? Visit our Help Center or contact our support team.
Growify enables you to track the performance of your X (formerly Twitter) ads using UTM parameters. This guide will walk you through how to properly set up tracking so you can measure X Ads impact across your customer journey inside Growify.
Since X Ads do not support dynamic UTM parameters, you need to manually enter the campaign id, ad group id, and ad id as tracking parameters into the website URL of your promoted post. This manual entry is necessary for Growify to attribute ad platform clicks to sessions on your website accurately.
X requires these tracking parameters to be appended to the end of the Destination URL of each ad before the campaign & ad are published. Once published, a tweet and the Destination URL of that tweet can not be edited.
Go to X Ads Manager.
Create a New Campaign. Click on 'Create campaign' and choose your campaign objective.
Set Up Your Ad Group. Define your audience targeting, budget, and schedule.
Create Your Ad. Design your ad creative (tweet text, image, or video) and select your desired call-to-action.
Make sure the destination URL contains following parameters:
gr_source=twitter gr_campaign=REPLACE_WITH_CAMPAIGN_ID gr_adset_id=REPLACE_WITH_ADSET_ID gr_ad_id=REPLACE_WITH_AD_ID
Review and Launch. Double-check your ad preview and ensure the URL with UTM parameters is correct. Then, launch your campaign.
Need help? Visit our or or contact our support team.
Growify enables you to track the performance of your Applovin Ads using UTM parameters. This guide will walk you through how to properly set up tracking so you can measure Applovin Ads impact across your customer journey inside Growify.
Table of UTM parameters
Here is a table with all UTM parameters that Growify will use to track all new and existing Applovin Ads.
UTM Key
UTM Value
Alternative UTM Key
Description
gr_source
applovin
utm_source
Applovin Source Channel
Here is an example of a destination URL with the UTM parameters added:
When adding your Creative (Ad set) within campaign settings, go to the Landing URL section.
Tick Use Custom Creative Landing URL.
Add your landing URL and append to it tracking parameters from the table above.
Click Save.
Need help? Visit our or or contact our support team.
Growify's Shopify integration allows you to track customer events and gain deeper insights into your store's performance. Follow these steps to create and set up a custom pixel for tracking.
Note: This integration method can only be used if you are still using the Legacy Checkout page and have not yet migrated to
Growify enables you to track the performance of your Pinterest Ads using UTM parameters. This guide will walk you through how to properly set up tracking so you can measure Pinterest Ads impact across your customer journey inside Growify.
Table of UTM parameters
Here is a table with all UTM parameters that Growify will use to track all new and existing Pinterest Ads.
Integrate Meta Ads with Growify
Growify natively integrates with the Facebook Ads API to provide seamless tracking and attribution. Through this integration, we automatically pull all your current and historical Campaigns, Ad Sets, and Ads directly from your ad account—along with a comprehensive list of performance metrics.
Integrating your Meta Ads account with Growify allows you to track, analyze, and optimize your ad performance efficiently. Follow the steps below to ensure seamless tracking:
Table of UTM parameters
Here is a table with all UTM parameters that Growify will use to track all new and existing Meta Ads.
Growify enables you to track the performance of your ShareASale Ads using UTM parameters. This guide will walk you through how to properly set up tracking so you can measure ShareASale Ads impact across your customer journey inside Growify.
Table of UTM parameters
Here is a table with all UTM parameters that Growify will use to track all new and existing ShareASale Ads.
Growify enables you to track the performance of your LinkedIn Ads using UTM parameters. This guide will walk you through how to properly set up tracking so you can measure LinkedIn Ads impact across your customer journey inside Growify.
Table of UTM parameters
Here is a table with all UTM parameters that Growify will use to track all new and existing LinkedIn Ads.
Growify enables you to track the performance of your Reddit Ads using UTM parameters. This guide will walk you through how to properly set up tracking so you can measure Reddit Ads impact across your customer journey inside Growify.
Table of UTM parameters
Here is a table with all UTM parameters that Growify will use to track all new and existing Reddit Ads.
Growify enables you to track the performance of your Snapchat Ads using UTM parameters. This guide will walk you through how to properly set up tracking so you can measure Snapchat Ads impact across your customer journey inside Growify.
Table of UTM parameters
Here is a table with all UTM parameters that Growify will use to track all new and existing Snapchat Ads.
The Growify Pixel is a code snippet that enables us to gather behavioral data about your website visitors. The data feeds into our backend graph, allowing us to track customer journeys from site visit to purchase, along with marketing touchpoints in between.
Copy & paste the following script inside the tag on every page of your website.
Growify enables you to track the performance of your TikTok ads using UTM parameters. This guide will walk you through how to properly set up tracking so you can measure Adroll impact across your customer journey inside Growify.
Table of UTM parameters
Here is a table with all UTM parameters that Growify will use to track all new and existing AdRoll Ads.
<script
            src="https://cdn.growify.ai/pixel.min.js"
            data-website-id="ENTER_WORKSPACE_ID_HERE"
            data-endpoint="api_v2"
            data-platform="web"
        ></script>
utm_medium
text
Campaign ID
Locate the Website URL Field. When configuring your call-to-action button or adding a link to your ad, you'll find a field to enter your website URL.
Inject UTM Parameters. Append your UTM parameters directly to the end of your website URL in this field.


gr_campaign
{Campaign}
utm_campaign
Campaign Name
gr_term
{AdGroup}
utm_term
Ad Group Name
gr_content
{Keyword}
utm_content
The keyword the user searched for

gr_campaign
{CAMPAIGN_ID}
Campaign ID
gr_ad_id
{AD_ID}
Ad ID
{campaignid}
utm_campaign
Campaign ID
gr_adset_id
{adgroupid}
Ad Group ID
gr_ad_id
{adid}
Ad ID
Here is an example of a destination URL with the UTM parameters added:
Click the hamburger icon at the top-left of your screen
Below Manage business, select Business Manager
Click Ad accounts at the left of the screen
Select the ad account you want to add URL parameters to
Click the Settings tab
Make sure the destination URL contains a utm_source=pinterest, if the utm_source is not equal to “pinterest”, please add a param &gr_source=pinterest at the end of your url. Add this for new and existing ads.
Check the box next to Apply URL parameters automatically to all current and future campaigns.
Growify will now track and analyze your Pinterest campaign performance. You can view insights directly in your Growify dashboard.
Need help? Visit our Help Center or contact our support team.
UTM Key
UTM Value
Alternative UTM Key
Description
gr_source
utm_source
Pinterest Source Channel
gr_campaign
!!USERID!!
utm_campaign
User ID
gr_term
!!BANNERID!!
utm_term
Banner ID
Here is an example of a destination URL with the UTM parameters added:
Navigate to your ShareASale account and go to the "Links" tab.
Find the "Custom Link" tool.
Select "Create a Custom Link to a Page" from the dropdown.
Append UTM parameters to the end of the destination URL
Make sure the destination URL contains a utm_source=shareasale, if the utm_source is not equal to “shareasale”, please add a param &gr_source=shareasale at the end of your url. Add this for new and existing ads.
Generate the custom link
Need help? Visit our Product Documentation or Help Center or contact our support team.
UTM Key
UTM Value
Alternative UTM Key
Description
gr_source
shareasale
utm_source
ShareASale Source Channel
gr_campaign
{{CAMPAIGN_ID}}
utm_campaign
Campaign ID
gr_adset_id
{{CAMPAIGN_GROUP_ID}}
Adset ID
gr_ad_id
{{CREATIVE_ID}}
Ad ID
Here is an example of a destination URL with the UTM parameters added:
Go to the Campaign Manager in your LinkedIn Ads account.
Select the campaign you want to edit.
Click on the ad you want to update and click Edit.
Scroll to the Destination URL field.
Append the UTM parameters to your landing page URL.
Make sure the destination URL contains a utm_source=linkedin, if the utm_source is not equal to “linkedin”, please add a param &gr_source=linkedin at the end of your url. Add this for new and existing ads.
Click Save to update your ad.
Need help? Visit our Product Documentation or Help Center or contact our support team.
UTM Key
UTM Value
Alternative UTM Key
Description
gr_source
utm_source
LinkedIn Source Channel
gr_campaign
{{CAMPAIGN_ID}}
utm_id
Campaign ID
gr_adset_id
{{ADGROUP_ID}}
adgroup_id
Ad Group ID
gr_ad_id
{{AD_ID}}
ad_id
Ad ID
gr_term
{{AD_NAME}}
utm_term
Ad Name Term
Here is an example of a destination URL with the UTM parameters added:
Navigate to the Ads section in the dashboard.
Click on the three dots next to an ad that you want to add UTMs to.
Click on the "Edit Ad" button.
Scroll down to the "Destination URL" section.
Add the UTM parameter to the destination URL.
Make sure the destination URL contains a utm_source=reddit, if the utm_source is not equal to “reddit”, please add a param &gr_source=reddit at the end of your url. Add this for new and existing ads.
Save your changes.
Need help? Visit our Product Documentation or Help Center or contact our support team.
UTM Key
UTM Value
Alternative UTM Key
Description
gr_source
utm_source
Reddit Source Channel
gr_campaign
{{CAMPAIGN_ID}}
utm_id
Campaign ID
gr_adset_id
{{ADGROUP_ID}}
adgroup_id
Ad Group ID
gr_ad_id
{{AD_ID}}
ad_id
Ad ID
gr_term
{{AD_NAME}}
utm_term
Ad Name Term
Make sure the destination URL contains a utm_source=adroll, if the utm_source is not equal to “adroll”, please add a param &gr_source=adroll at the end of your url. Add this for new and existing ads.
Here is an example of a destination URL with the UTM parameters added:
Go to the Ad Library tab in the left navigation menu.
Hover over an ad that you want to add a UTM to.
Click Edit.
Click on 'Edit UTM' and edit the UTM parameters.
Go to the left navigation menu and click Ad Library.
Click Create and select Upload Web Ads.
Fill out the necessary fields.
Enter the destination URL with UTMs included.
Need help? Visit our Product Documentation or Help Center or contact our support team.
UTM Key
UTM Value
Alternative UTM Key
Description
gr_source
utm_source
Reddit Source Channel
gr_campaign
<script type="application/javascript">
    window.grp('conversion', {
                userEmail: '[email protected]',
                userFirstName: 'John',
                userLastName: 'Doe',
                userId: 'test-user',
                orderId: 'ORD122',
                tax: 2,
                shipping: 5,
                products: [
                    {
                    productId: 'SKU123',
                    productName: 'Pixel Shirt',
                    productPrice: 20,
                    productBrand: 'Growify',
                    productQuantity: 1,
                    purchaseValue: 20
                    }
                ]
                })
</script>https://www.example.com/?gr_source=bing&gr_campaign={Campaign}&gr_term={AdGroup}&gr_content={Keyword}https://www.example.com/?gr_source=applovin&gr_campaign={CAMPAIGN_ID}&gr_ad_id={AD_ID}https://www.example.com/?gr_source=pinterest&gr_campaign={campaignid}&gr_adset_id={adgroupid}&gr_ad_id={adid}https://www.example.com/?gr_source=shareasale&gr_campaign=!!USERID!!&gr_term=!!BANNERID!!https://www.example.com/?gr_source=linkedin&gr_campaign={{CAMPAIGN_ID}}&gr_adset_id={{CAMPAIGN_GROUP_ID}}&gr_ad_id={{CREATIVE_ID}}https://www.example.com/?gr_source=reddit&gr_campaign={{CAMPAIGN_ID}}&gr_adset_id={{ADGROUP_ID}}&gr_ad_id={{AD_ID}}&gr_term={{AD_NAME}}https://www.example.com/?gr_source=adroll&gr_campaign=[ADROLL:CAMPAIGN_EID]&gr_adset_id=[ADROLL:AD_GROUP_EID]&gr_ad_id=[ADROLL:AD_EID]Recommended to complete the migration of your system by August 28, 2025. The migration guide can be found at the following link: Checkout Extensibility Migration If you are already using Shopify Extensibility, please use this guide.
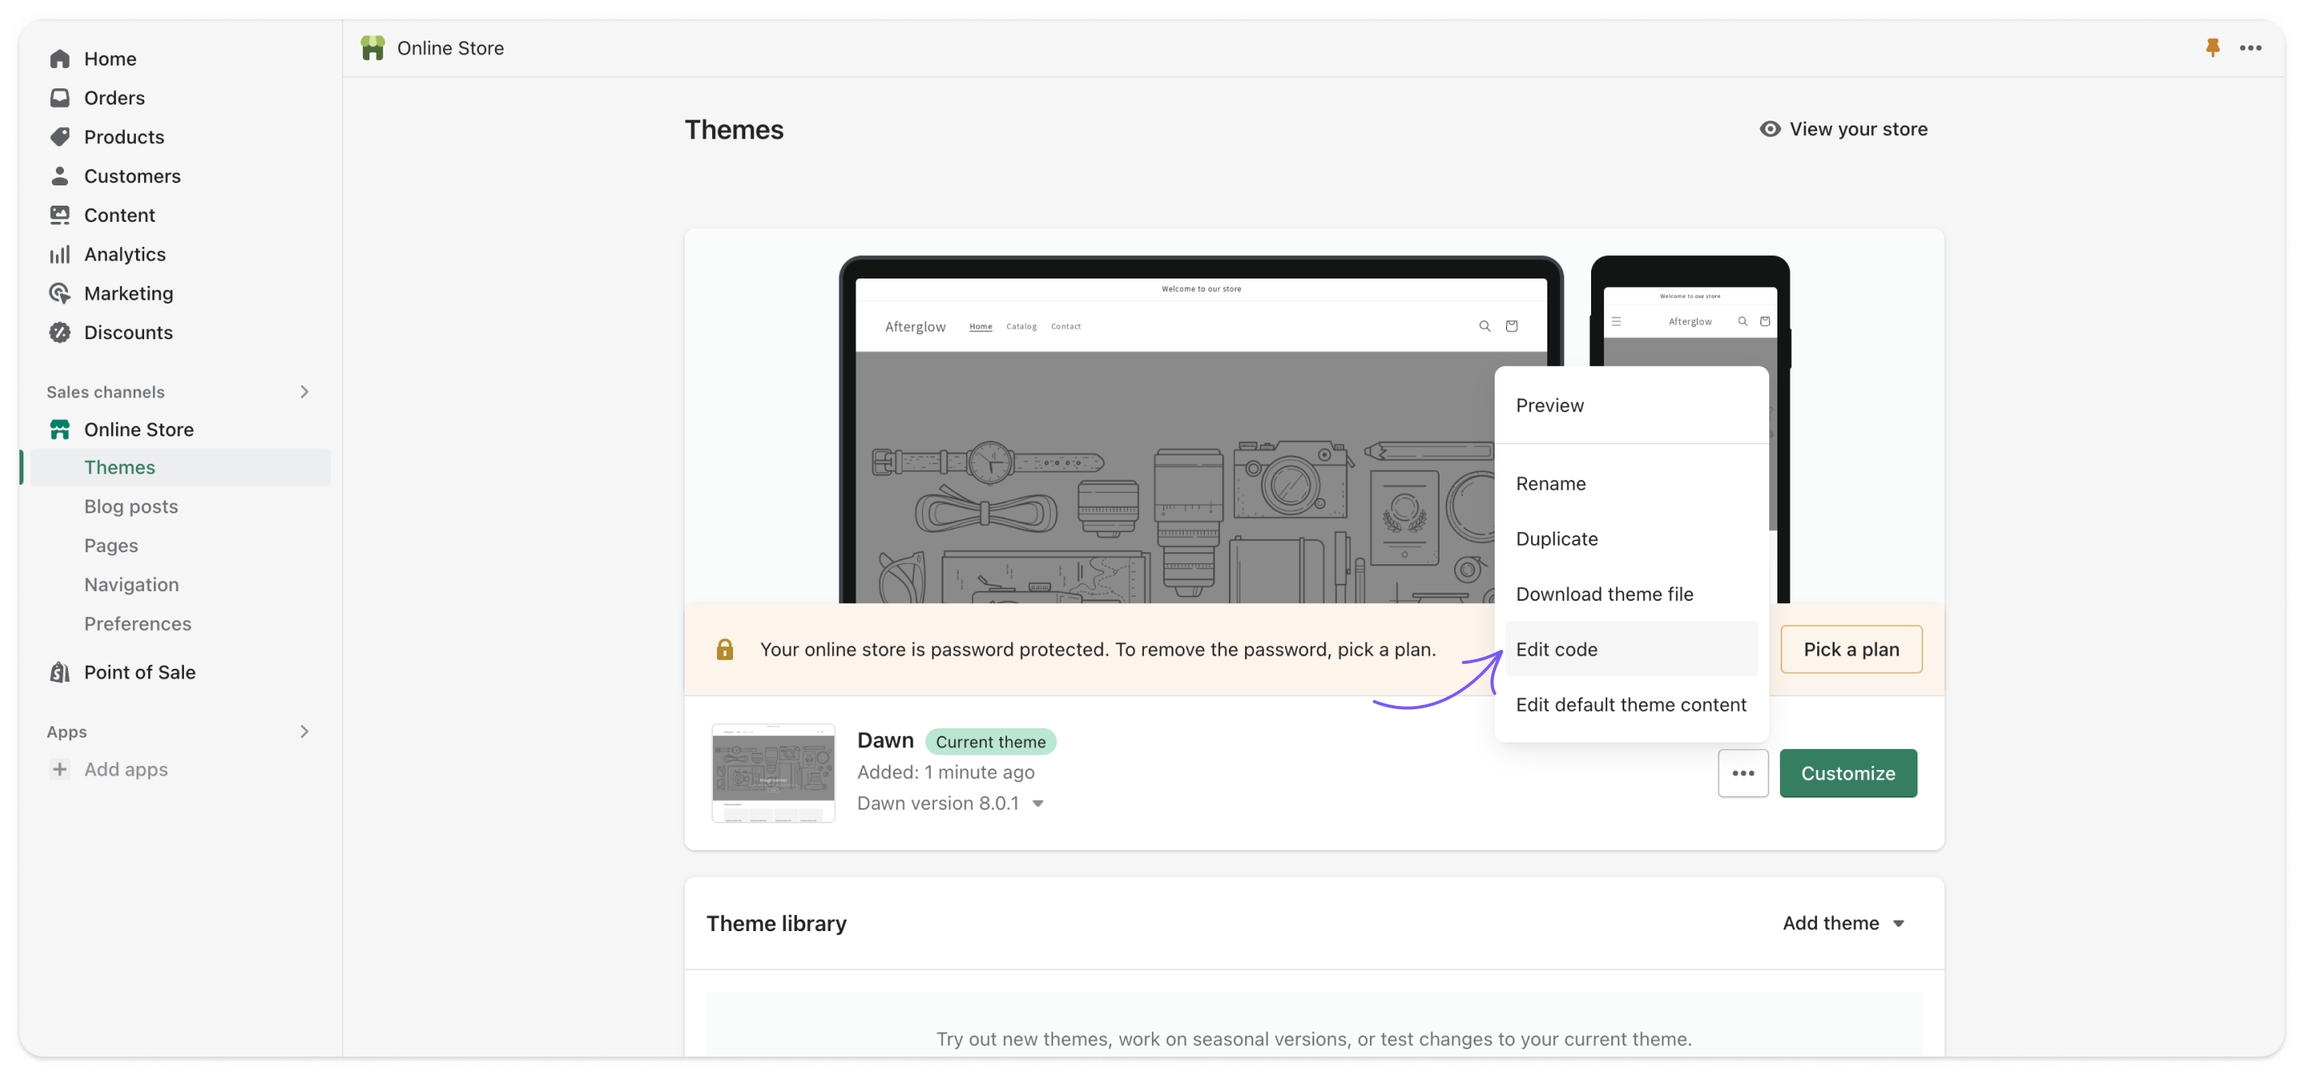
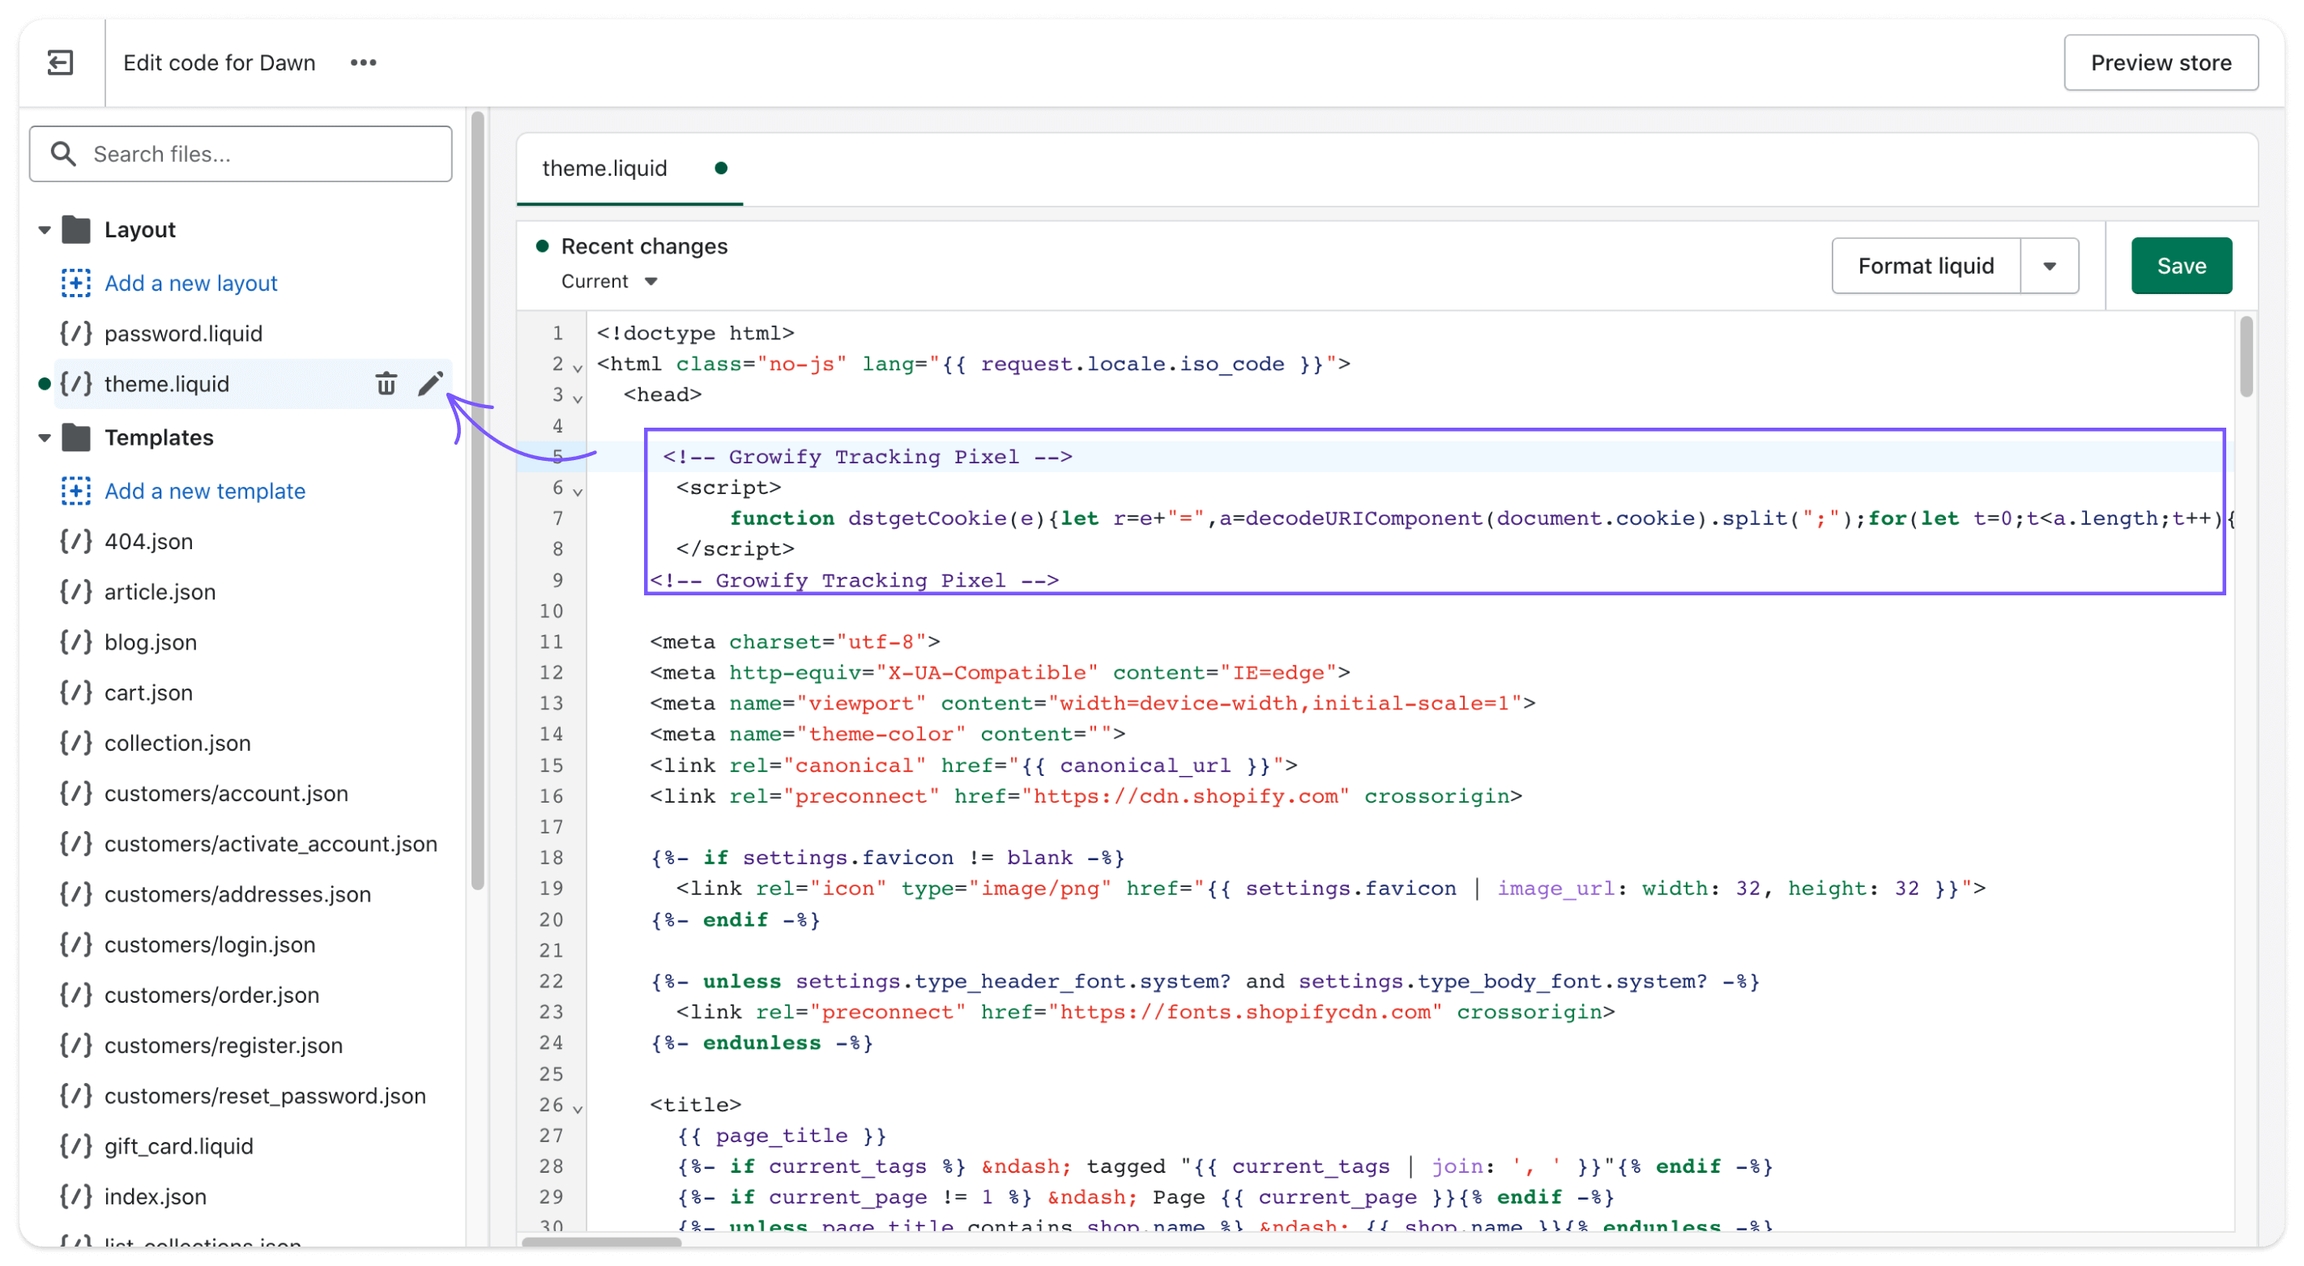
Go to Online Store → Themes → Edit code
Copy and add the following Growify Pixel script to your theme.liquid file to start tracking view events.
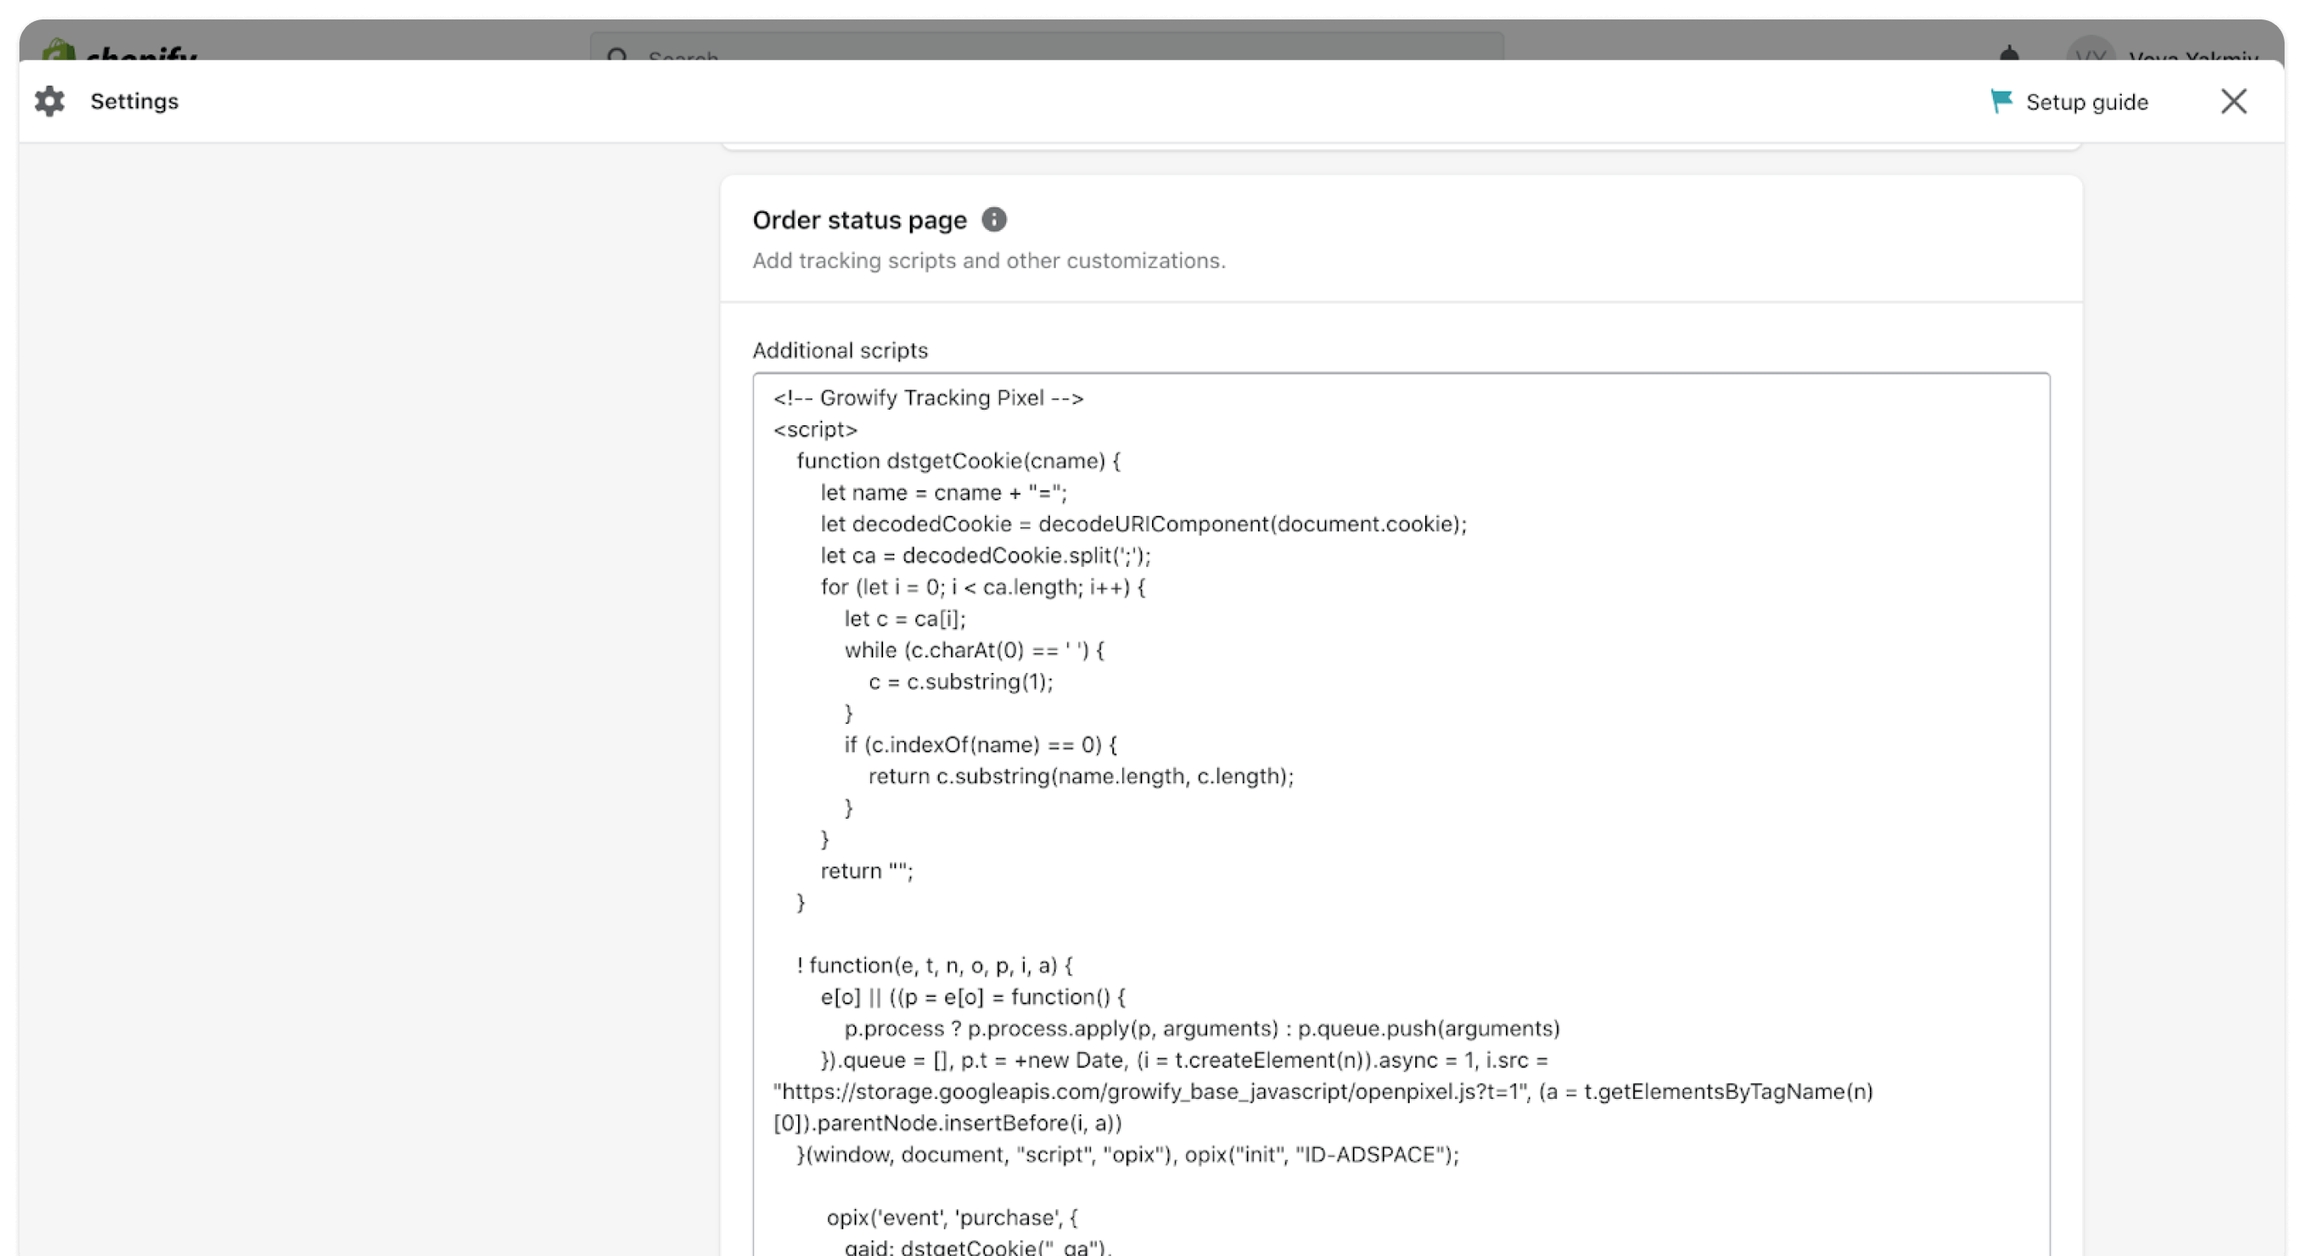
Copy and add the following script to your Checkout page to start tracking purchase events.
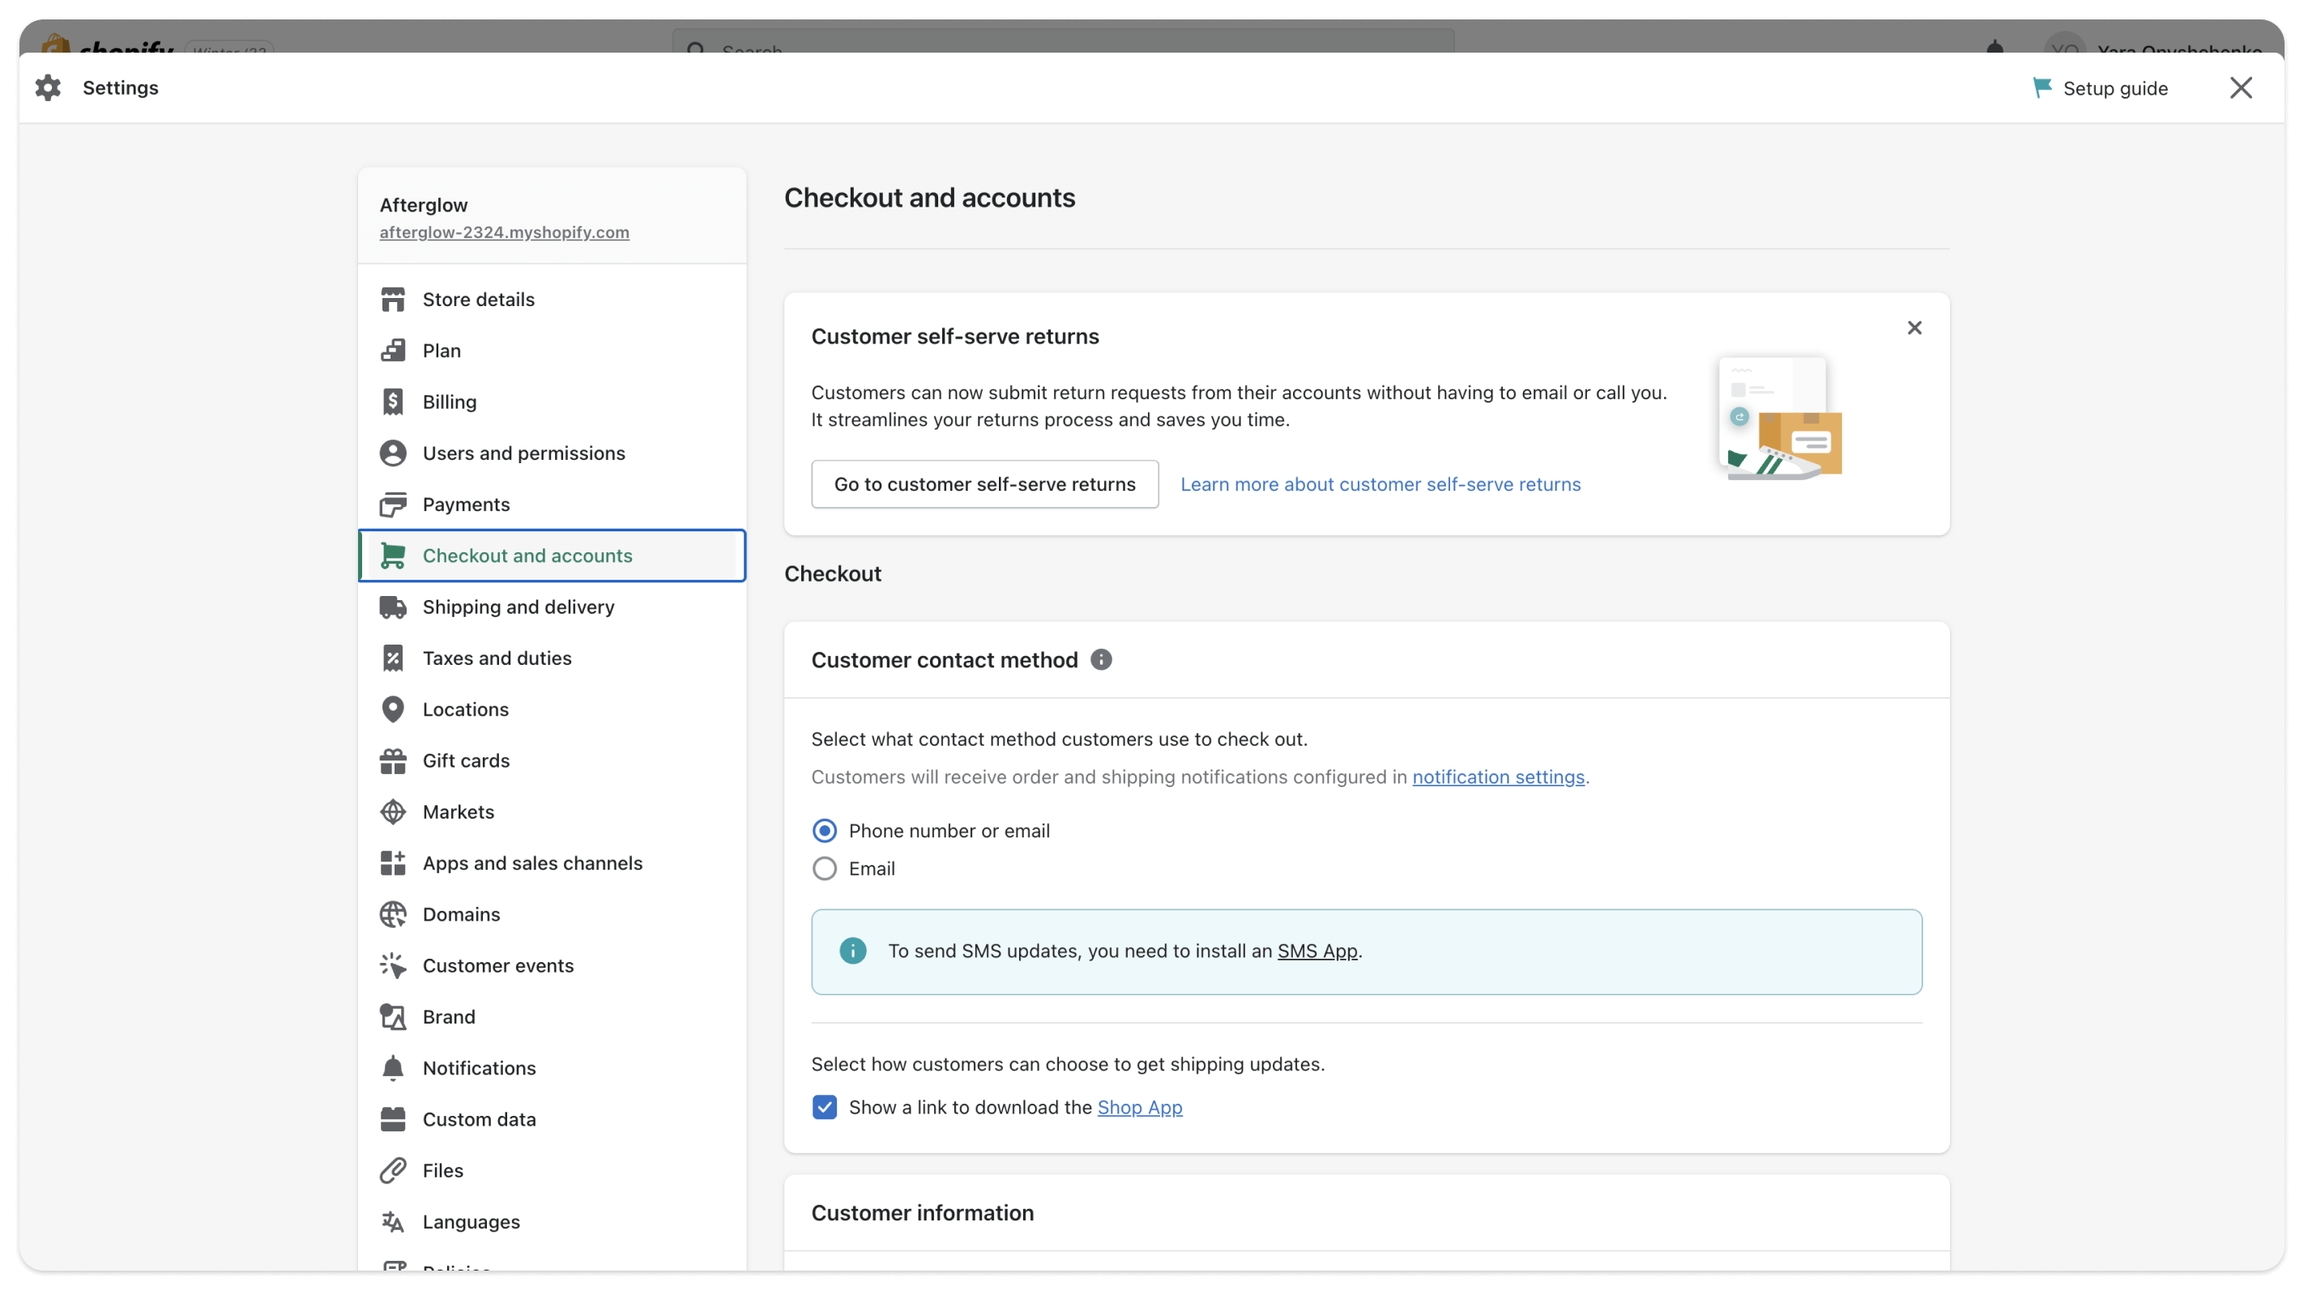
Go to Settings → Checkout and accounts → Scroll to Additional Scripts
Insert a script and save.
utm_source
Ad Source Channel
gr_campaign
{{campaign.id}}
utm_campaign
fbc_id
fb_campaignid
Campaign ID
gr_term
{{adset.id}}
utm_term
fb_adsetid
Ad Group ID
gr_content
{{ad.name}}
utm_content
Ad Name
gr_fbadid
{{ad.id}}
utm_id
fb_adid
Ad ID
Go to Meta Ads Manager.
Select the Campaign or Ad Set.
Click "Edit" to modify your ad settings.
Scroll to the “Tracking” section.
Find the “URL Parameters” field.
Copy the following UTM parameters in the URL Parameters field for all new and existing Meta Ads:
Click "Publish" to update your campaign.
Please Note the alternative columns and UTM parameters that Growify detects. If you are already using some of these, you can skip adding those specific parameters.
Growify will now track and analyze your Meta Ads performance. You can view insights directly in your Growify dashboard.
Need help? Visit our Help Center or contact our support team.
gr_source
{{campaign.id}}
Campaign ID
gr_adset_id
{{adSet.id}}
Ad Set ID
gr_ad_id
{{ad.id}}
Ad ID
Here is an example of a destination URL with the UTM parameters added:
In the Ad Details section of your ad setup, click on the Build URL parameters option.
In the Custom parameters setting add the utm parameters from the table above.
Click Continue.
Need help? Visit our Product Documentation or Help Center or contact our support team.
UTM Key
UTM Value
Alternative UTM Key
Description
gr_source
snapchat
utm_source
Snapchat Source Channel
gr_campaign
Our generic script to track Conversion events from any checkout page.
Please be sure it fires at the tail end of your customer journey — normally on your order confirmation page or thank you page.
It's recommended that somebody with basic Javascript knowledge sets up the script to decrease the likelihood of any issues.
As soon as the Pixel is connected, Growify starts collecting events. To make sure that your fireConversion is triggering correctly, please check the Pixel status in the status bar ( last view and last purchase ).
Any misfires will cause a lack of tracking and attribution for any associated orders.
Any missing or incorrect historical pixel data cannot be recovered. That said, it’s extremely important that your fireConversion fires correctly from day one.
Growify offers a dashboard to verify your Pixel is triggering correctly. Go to the Integration tab in your Workspace to check the status.
Currency
The pixel assumes all incoming data uses the same currency as the Workspace currency.
Please ensure the currency setting in Shopify (or your platform) aligns with the one set in the Workspace.
Validation
Products: A few key products must be included in product array.
Product quantity: The orderId must be present and unique per transaction. If the id is missing or reused, that may be a signal of duplicate firing.
Product price: Total value should be greater than 0.
Sequence
Ensure the Growify Pixel is installed and triggered (Step 1) BEFORE firing the Conversion Event.
The Growify PowerPixel is a code snippet that enables us to gather behavioral data about your website visitors. The data feeds into our backend graph, allowing us to track customer journeys from site visit to purchase, along with marketing touchpoints in between.
✅ If you complete this GTM setup, you do not need to do the manual site integration.
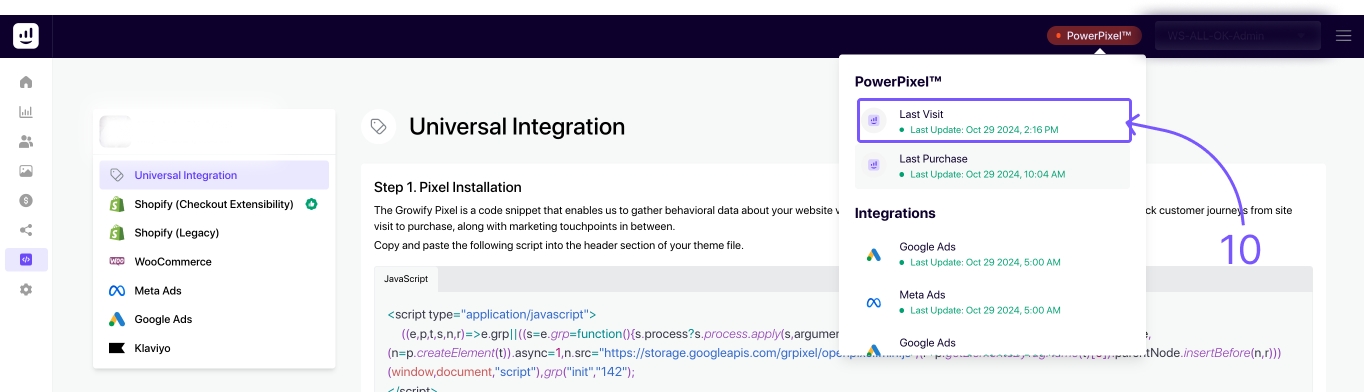
Go to and select the website where you want to install the Growify Power Pixel (1)
Click on Add a new tag (2)
Give the tag a clear name, such as "Growify Pixel", to make it easy to identify in the future (3).
Then, navigate to the Tag Configuration section and click on "Choose a tag type to begin setup..." to proceed (4)
5. In the "Choose a tag type" menu, click "Custom HTML" type (5)
Complete the following steps to add the Growify PowerPixel:
Add the PowerPixel to the HTML section of the screen. You can find your code snippet below (6)
Select Support document.write (7)
Set Tag firing priority to "99" (8)
Set Tag firing options to "Once per page" (9)
Click "Choose a trigger to make this tag fire..." to configure Trigger settings and Select All Pages (10)
Click Save to save the tag
Click Submit and Publish to go live (11)
Step 1: Navigate to your store's homepage
Step 2: Open a DevTools
Windows: Ctrl + Shift + I or F12
macOS: ⌘ + ⌥ + I
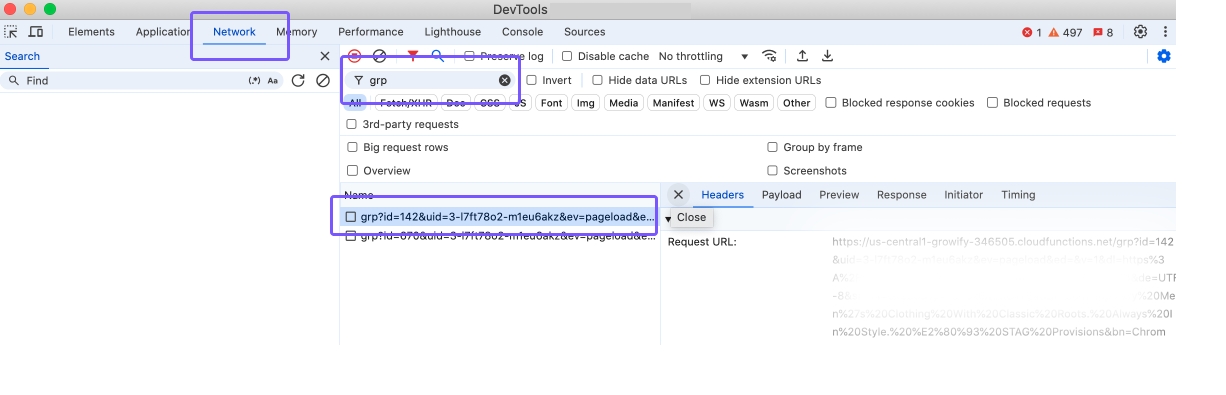
Refresh the page, then go to the Network Tab. Filter by the keyword 'grpV2' and locate the event
4/ If the event has been located, the status will be updated as soon as the data is indexed (which takes around 10-15 minutes) on the Growify dashboard (10)
Great job! The Power Pixel SDK has been successfully installed and view events are now being collected.
Our generic script to track Conversion events from any checkout page. Please be sure it fires at the tail end of your customer journey -- normally on your 'order confirmation page' or 'thank you page'.
The SDK should be configured to run on your Order Details page. Ensure that Steps 1 and 2 are properly set up. It's recommended that somebody with basic GTM and Javascript knowledge sets up the script to decrease the likelihood of any issues.
You can fire the Purchase event using:
- Native JavaScript Integration
- Custom Tag with GTM Data Layer
Note: If you use the GTM Data Layer, we assume you are familiar with Variables and Triggers.
Example: Firing a Purchase Event (Native JavaScript Integration)
Validation
Products: At least one product must be included in the products array.
Product quantity: This is required and must be an integer value greater than 0. If the value is missing, null, less than or equal to 0, or non-numeric, the conversion event will not be triggered.
Product price: This is required and must be a number value greater than 0. If the value is missing, null, less than or equal to 0, or non-numeric, the conversion event will not be triggered.
Currency
The pixel assumes that all incoming data uses the same currency as the Workspace currency.
Please ensure that currency conversion is handled on your end before firing an event in the same currency as the Workspace.
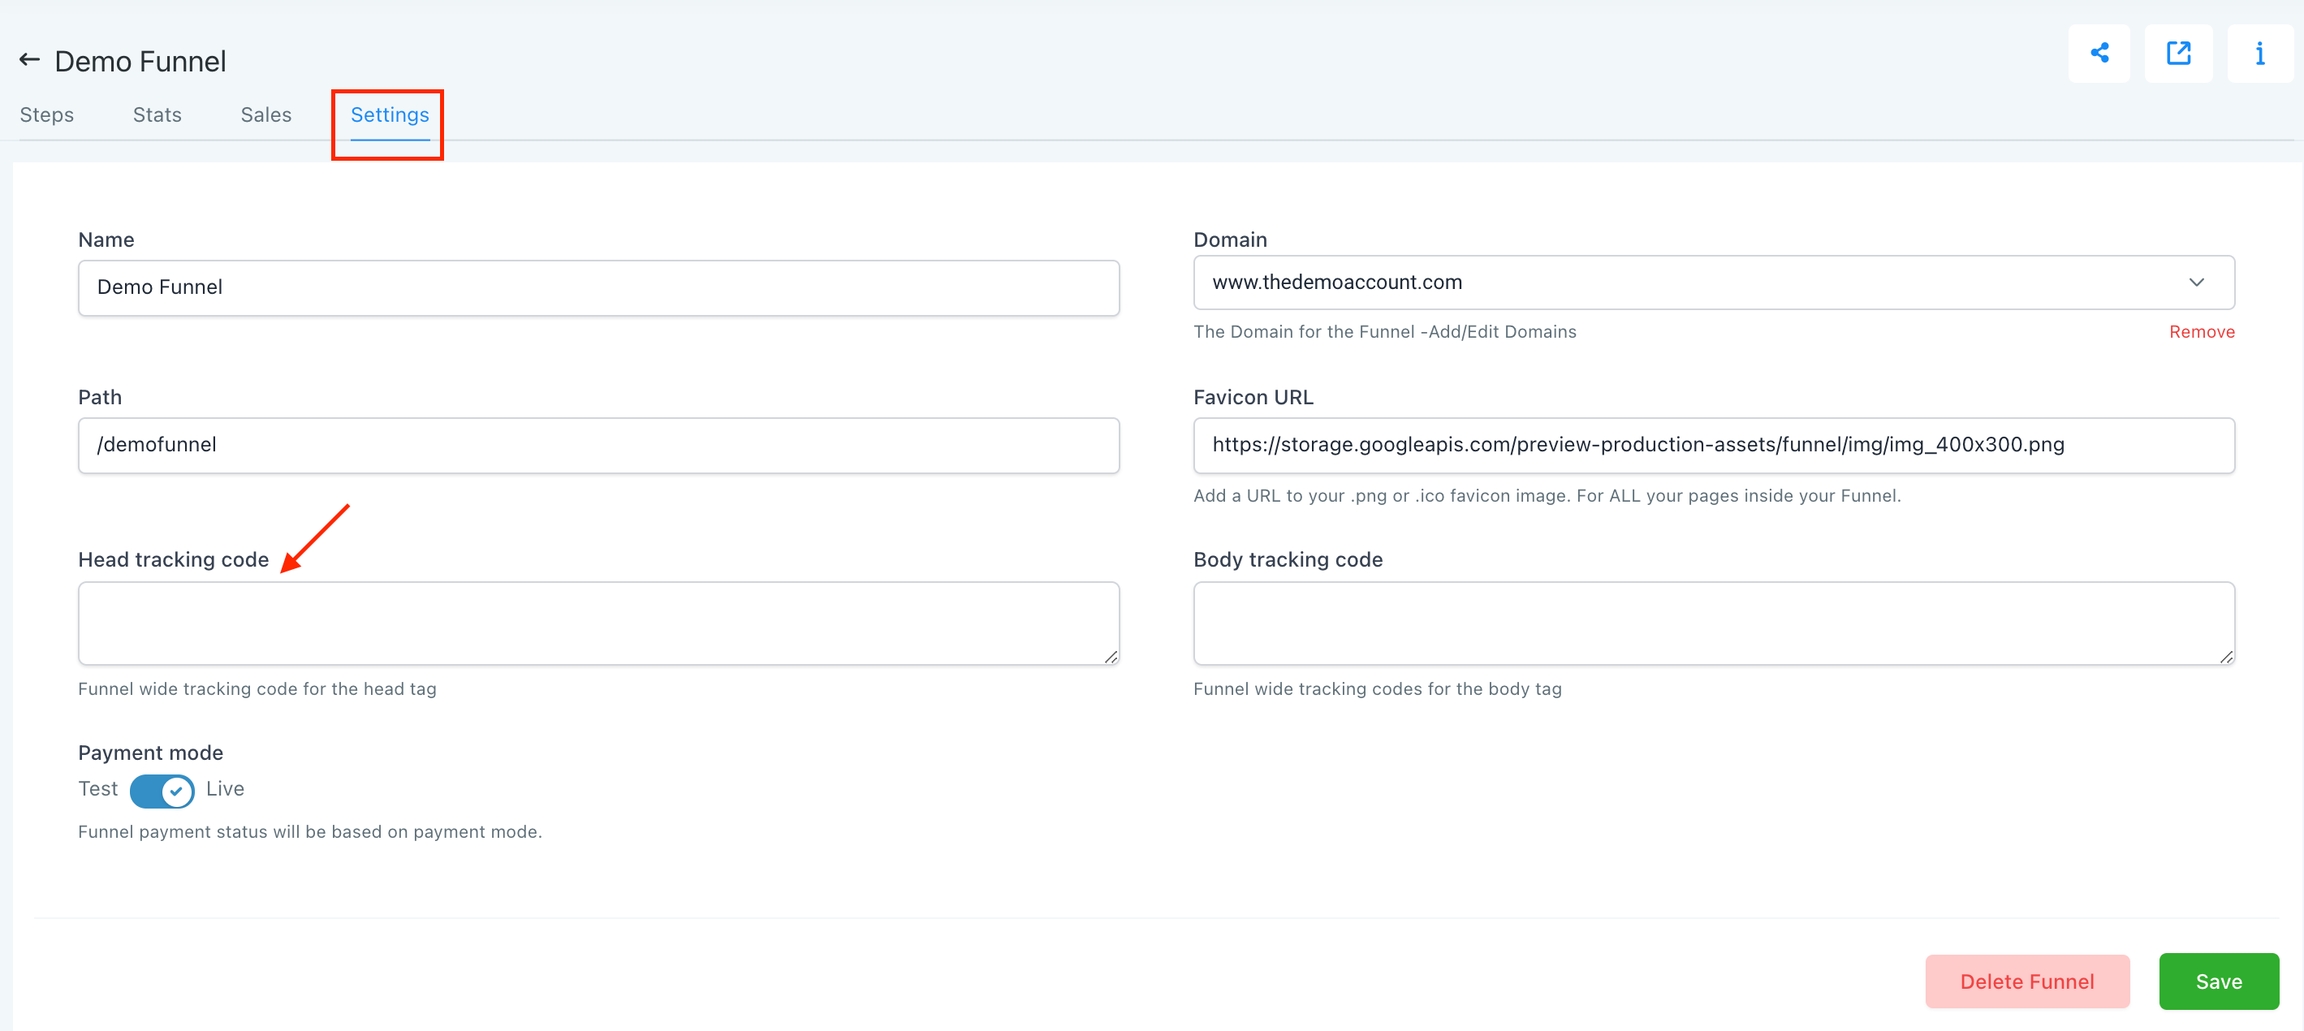
Growify’s Go High Level integration allows you to track customer events and gain deeper insights into your store’s performance. Follow these steps to create and set up a custom pixel for tracking.
Copy the main pixel code from this snippet here.
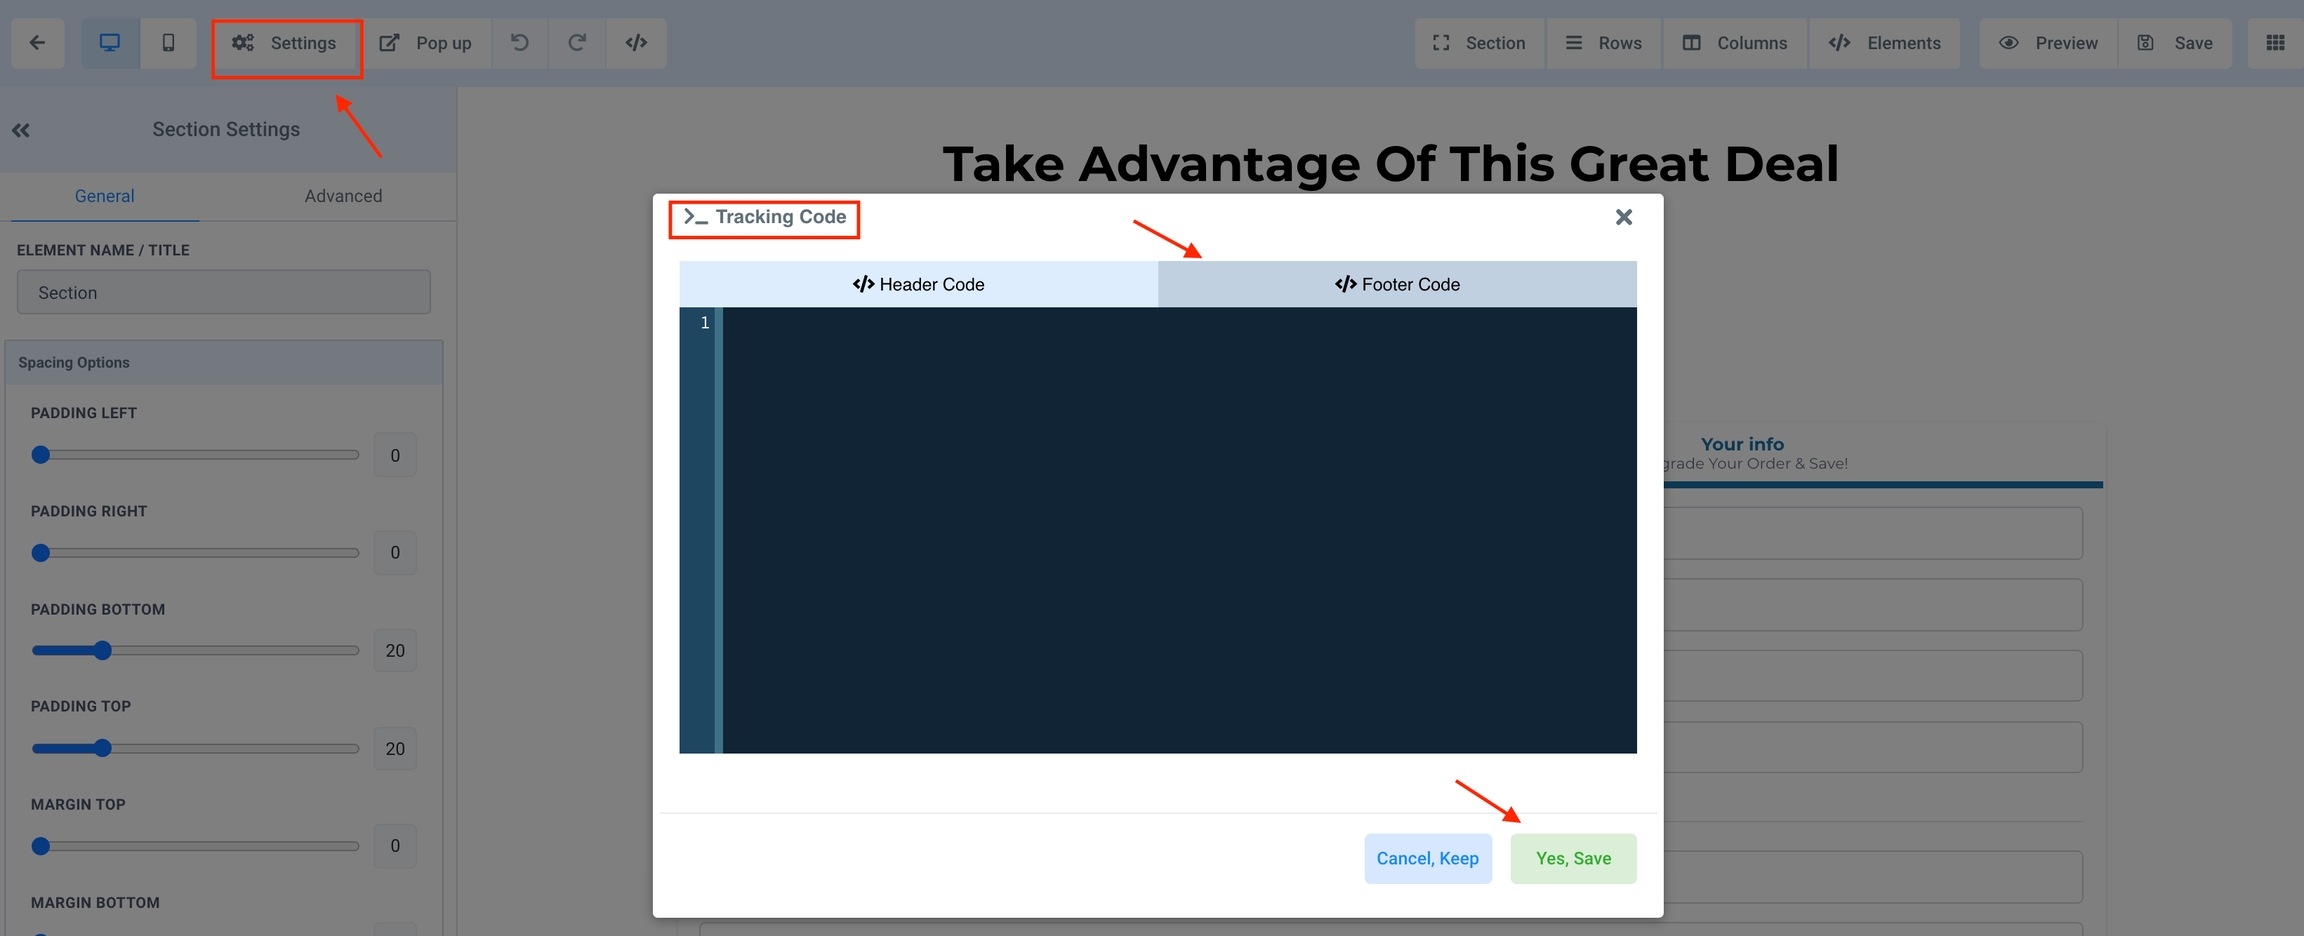
Navigate to your Funnel.
Click Settings → Paste in your Pixel Code to the Head Tracking Code Section.
Save your changes.
Choose the Step where the conversion event is occurring.
Edit the Step.
Choose Settings → Tracking Code.
Copy the event code from the snippet below.
Click Footer Code and paste in the Event Code.
Save your changes.
Navigate to your store's homepage
Open a DevTools
Windows: Ctrl + Shift + I or F12
macOS: ⌘ + ⌥ + I
3. Refresh the page, then go to the Network Tab. Filter by the keyword 'grp' and locate the event
If the event has been located, the status will be updated as soon as the data is indexed (which takes around 10-15 minutes) on the Growify dashboard (10)
Great job! The Power Pixel SDK has been successfully installed and view events are now being collected.
The pixel assumes all incoming data uses the same currency as the Workspace currency.
Please ensure the currency setting in Shopify (or your platform) aligns with the one set in the Workspace.
Validation
Products: A few key products must be included in product array.
Product quantity: The orderId must be present and unique per transaction. If the id is missing or reused, that may be a signal of duplicate firing.
Product price: Total value should be greater than 0.
Sequence
Ensure the Growify Pixel is installed and triggered (Step 1) BEFORE firing the Conversion Event.
Growify enables you to track the performance of your TikTok ads using UTM parameters. This guide will walk you through how to properly set up tracking so you can measure TikTok’s impact across your customer journey inside Growify.
Table of UTM parameters
Here is a table with all UTM parameters that Growify will use to track all new and existing TikTok Ads.
UTM Key
UTM Value
Alternative UTM Key
Description
gr_source
tiktok
utm_source
TikTok Source Channel
Here is an example of a destination URL with the UTM parameters added:
Go to the Ad Level of your campaign.
Select the Ad and Click Edit
Scroll to the Destination URL field.
Append the UTM parameters to your landing page URL.
Make sure the destination URL contains a utm_source=tiktok. If the utm_source is not equal to "tiktok", please add a param &gr_source=tiktok at the end of your URL. Add this for new and existing ads.
Click “Save”.
Growify will now track and analyze your TikTok campaign performance. You can view insights directly in your Growify dashboard.
Need help? Visit our Help Center or contact our support team.
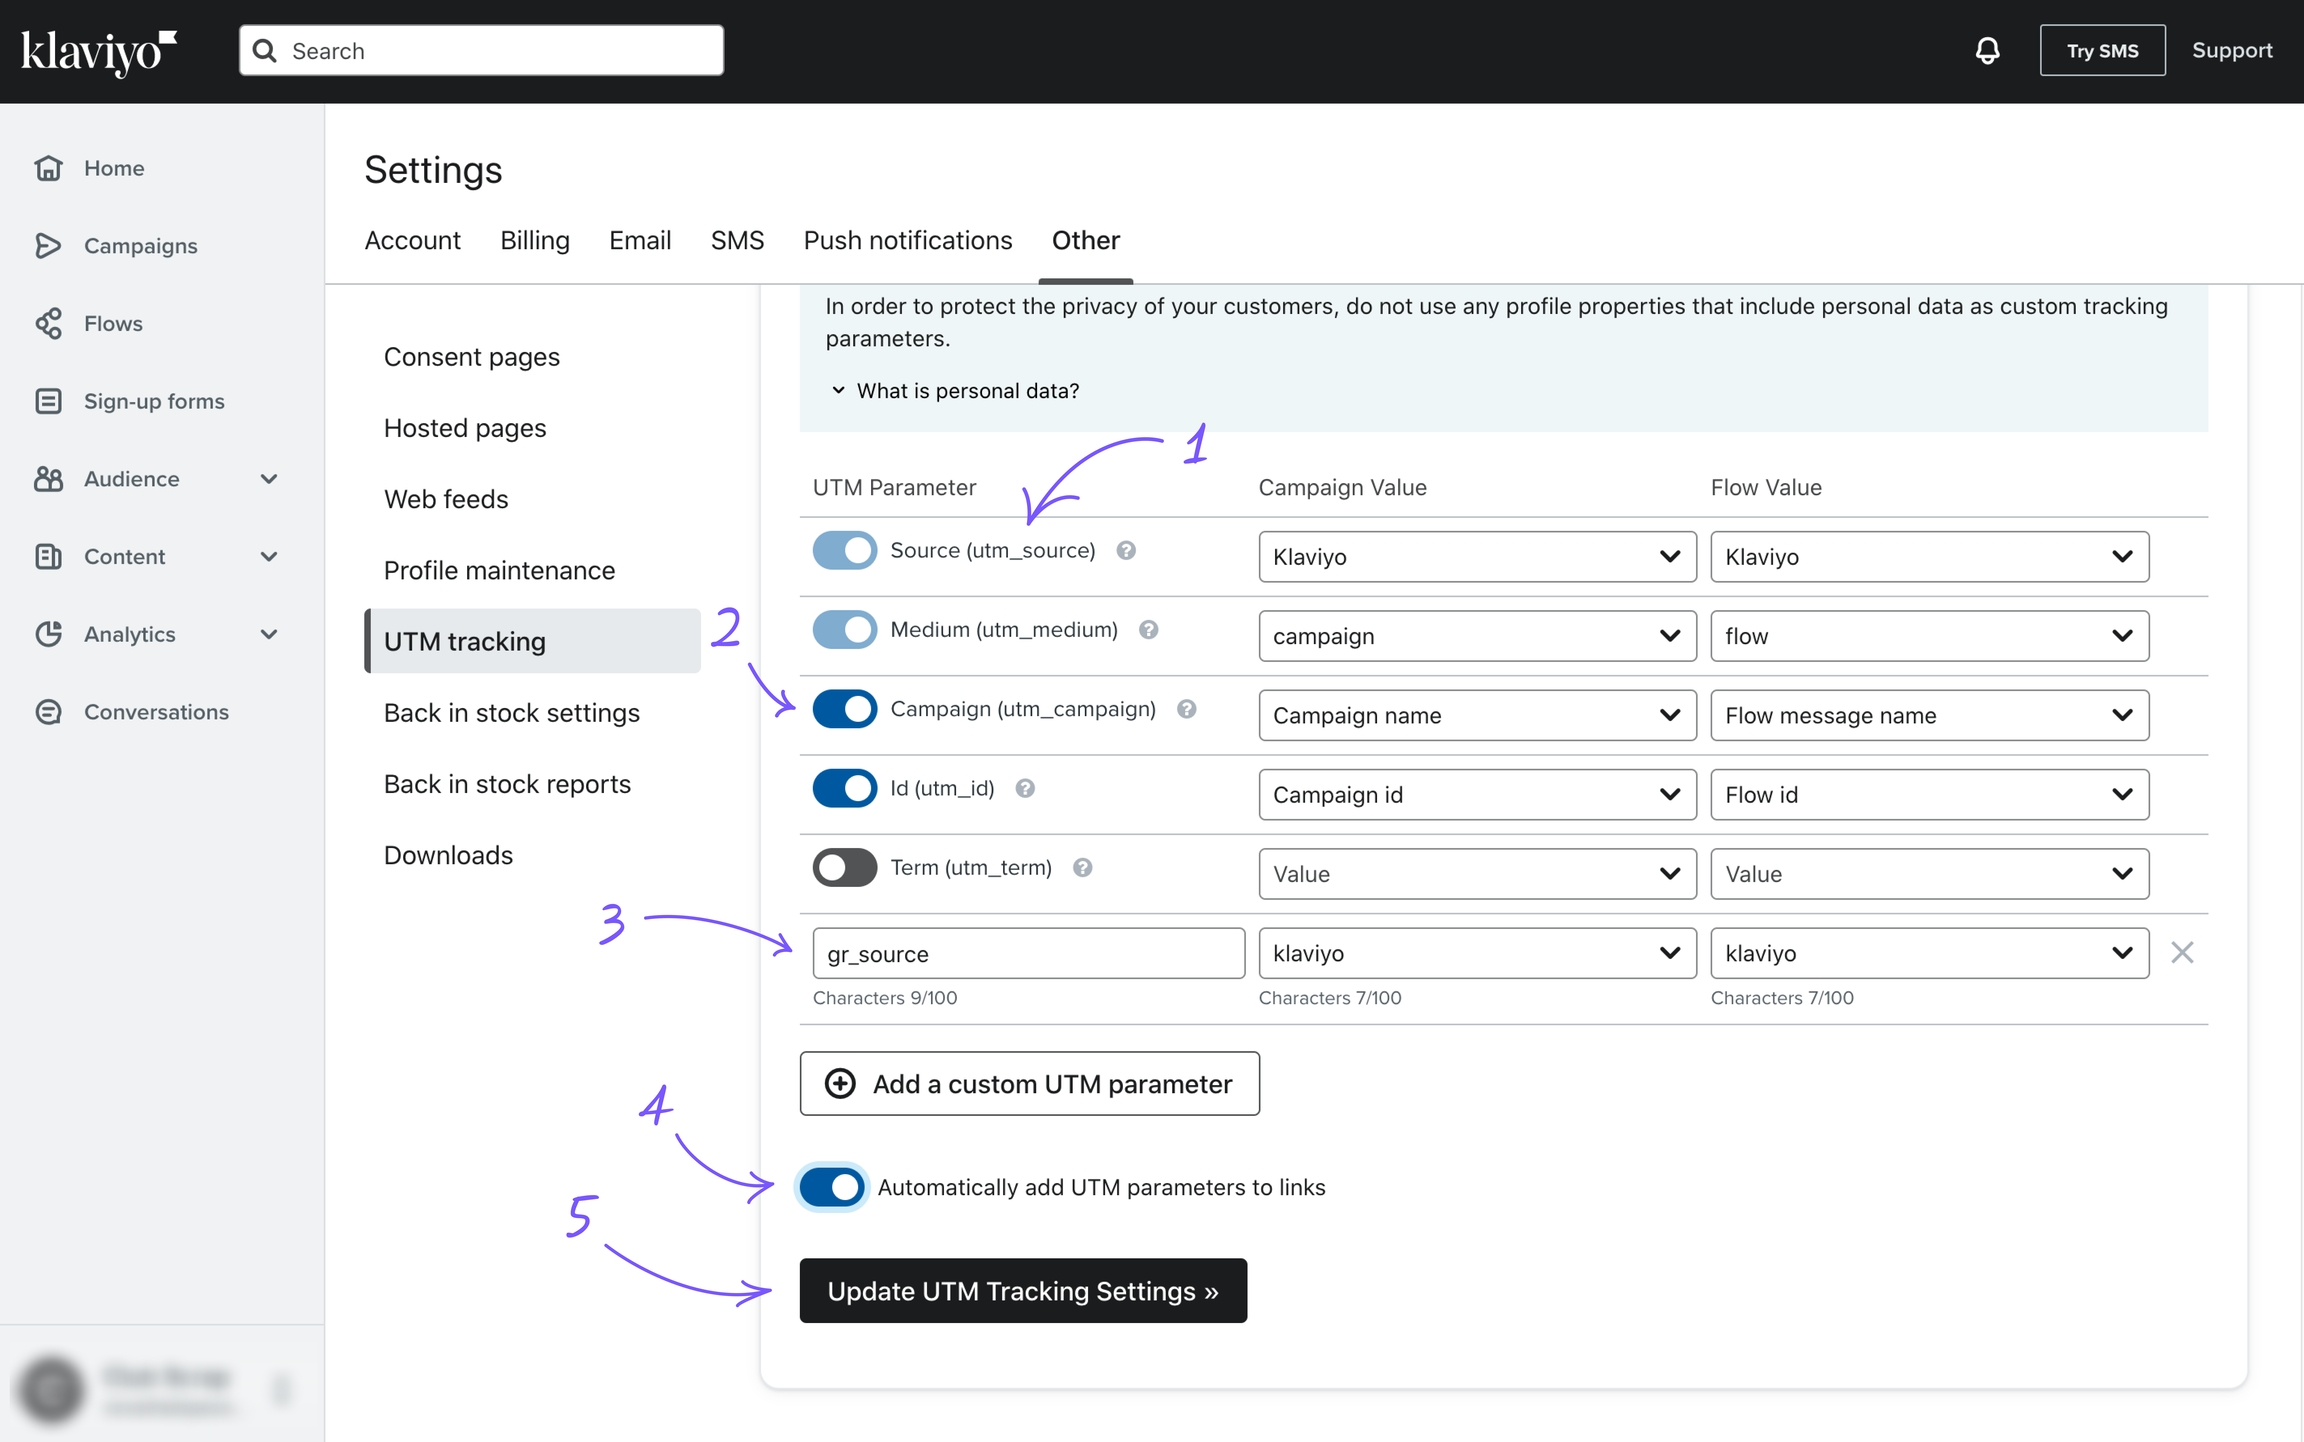
Growify natively integrates with Klaviyo API. Integrating your Klaviyo account with Growify allows you to track and analyze your email marketing performance more effectively. Follow these steps to enable UTM tracking in Klaviyo.
Table of UTM parameters
Here is a table with all UTM parameters that Growify will use to track all new and existing Klaviyo Ads.
gr_source
klaviyo
utm_source
Klaviyo Source Channel
Click on Account
Click on Settings
Go to Other tab and click on UTM tracking submenu.
Ensure your Campaign & Flow values for utm_source are set as klaviyo.
Ensure utm_medium, utm_campaign, utm_id tracking params are enabled.
Click + Add a custom UTM parameter and fill in the form:
UTM Parameter: gr_source
Campaign Email Value: klaviyo
Flow Email Value: klaviyo
Toggle on the Automatically add UTM parameters to links option.
Click Update UTM Tracking Settings button.
Growify will now track and analyze your Klaviyo campaign performance. You can view insights directly in your Growify dashboard.
Need help? Visit our Help Center or contact our support team.
Growify enables you to track the performance of your Outbrain Ads using UTM parameters. This guide will walk you through how to properly set up tracking so you can measure Outbrain Ads impact across your customer journey inside Growify.
Table of UTM parameters
Here is a table with all UTM parameters that Growify will use to track all new and existing Outbrain Ads.
UTM Key
UTM Value
Alternative UTM Key
Description
gr_source
outbrain
utm_source
Outbrain Source Channel
Navigate to the campaign you want to add tracking to.
Click the pencil icon to open the campaign’s settings.
Add the following UTM code in the “Tracking” section.
Save your modification by clicking on the “Submit” button at the bottom of the screen. Your tracking code will automatically append to all headlines within the campaign.
Need help? Visit our or or contact our support team.
Growify enables you to track the performance of your Taboola Ads using UTM parameters. This guide will walk you through how to properly set up tracking so you can measure Taboola Ads impact across your customer journey inside Growify.
Table of UTM parameters
Here is a table with all UTM parameters that Growify will use to track all new and existing Taboola Ads.
UTM Key
UTM Value
Alternative UTM Key
Description
gr_source
taboola
utm_source
Taboola Source Channel
This is the tracking code you need to add to your Taboola Ads.
URL parameters can be added at the campaign level. This means the URL parameters added will be appended to every ad in that specific campaign. Here is how to add URL parameters at the campaign level:
When creating a new campaign or editing an existing campaign, you can add URL parameters at the bottom of the New Campaign/Edit Campaign page, in the Tracking Code section.
Navigate to the tracking code section and add the following code:
You should not add a question mark or an ampersand in the beginning of the tracking code (Taboola adds it automatically in their backend).
When creating new ads to a new or existing campaign, you can add URL parameters to individual destination URLs.
Create your ads for a new or existing campaign.
In the Landing Page URL section, add a question mark ("?") at the end of the original URL. A question mark should always separate your destination URL and your URL parameters.
Then, add these parameters at the end of the URL:
Save your ads to your campaign.
Need help? Visit our or or contact our support team.
Growify’s Shopify integration allows you to track customer events and gain deeper insights into your store’s performance. Follow these steps to create and set up a custom pixel for tracking.
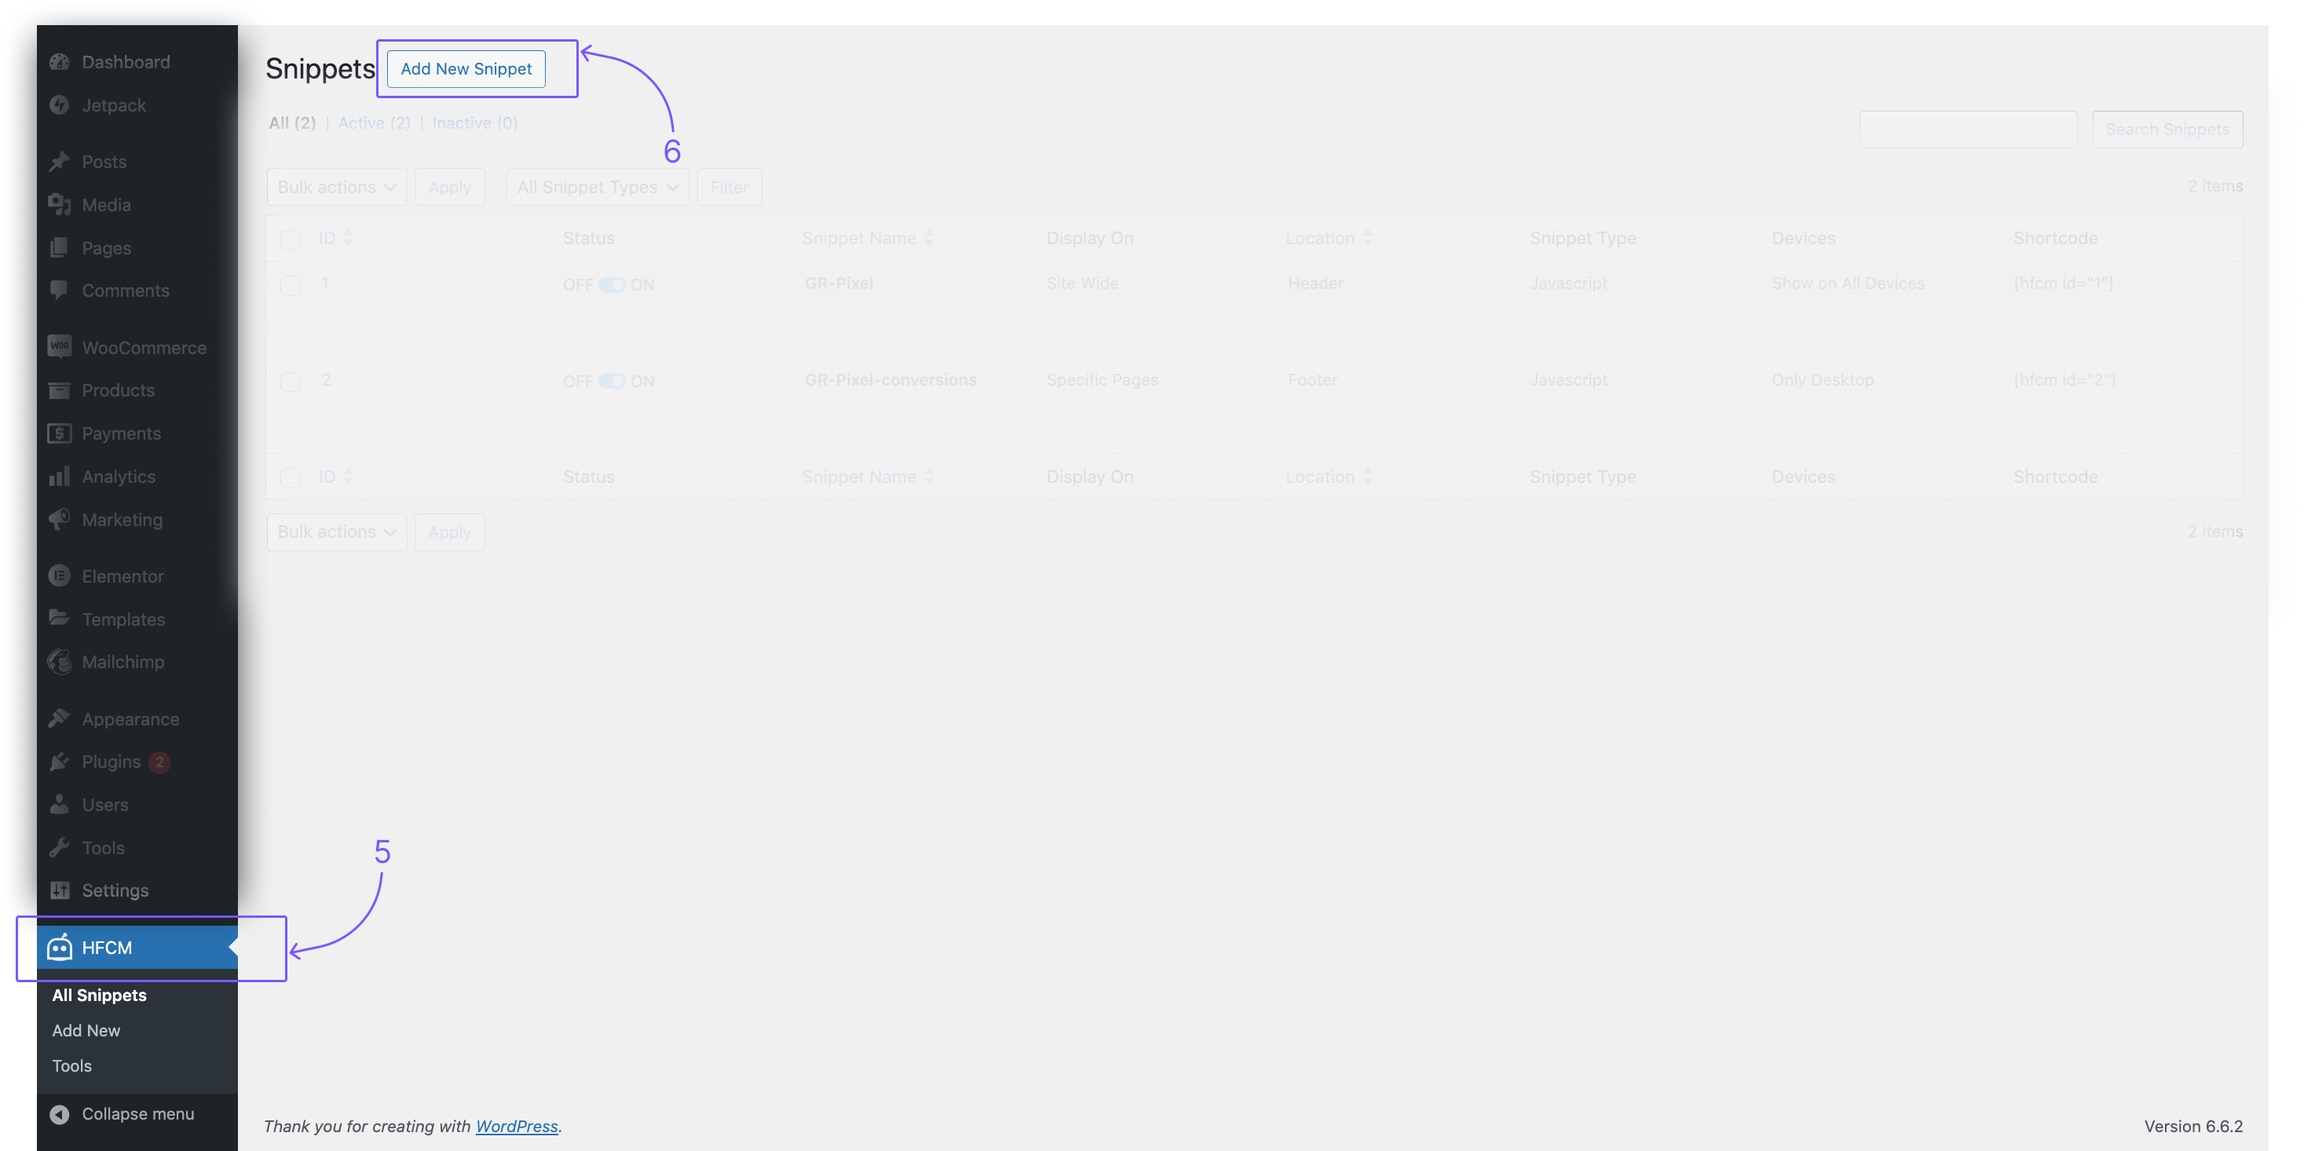
To connect your Shopify store to Growify simply head to the Shopify App Store and install our official Growify App.
The Growify PowerPixel is a lightweight code snippet that allows Growify to collect behavioral data about your website visitors. This data powers our attribution engine—helping track full customer journeys, from the first visit all the way to purchase, and every marketing touchpoint in between.
✅ If you complete this GTM setup, you do not need to do the manual site integration.
Go to
Pixel Connection is a powerful feature that allows you to connect your website’s pixel to Growify. With this feature, you can easily and their behavior, which will help you optimize your marketing strategies.
How Does Pixel Connection Work?
To use Pixel Connection, you simply need to connect your pixel to Growify. Once connected, you will be able to see real-time data on your website visitors, such as their behavior, location, and more. This data can be used to create targeted marketing campaigns and improve your overall marketing efforts.
Why Use Pixel Connection?
Using Pixel Connection is essential for any business that wants to optimize its marketing efforts. By tracking your website visitors and their behavior, you can create highly targeted marketing campaigns that are more likely to convert. Additionally, Pixel Connection allows you to track the ROI of your marketing efforts, which will help you identify areas for improvement and optimize your strategies over time.
Overall, Pixel Connection is a powerful tool that can help you take your marketing efforts to the next level. By connecting your website’s pixel to Growify, you can gain valuable insights into your visitors’ behavior, create targeted marketing campaigns, and optimize your overall marketing strategies for better results.
<script type="application/javascript">
     ((e,p,t,s,n,r)=>e.grp||((s=e.grp=function(){s.process?s.process.apply(s,arguments):s.queue.push(arguments)}).queue=[],s.t=+new Date,(n=p.createElement(t)).async=1,n.src="https://storage.googleapis.com/grpixel/openpixel.min.js",(r=p.getElementsByTagName(t)[0]).parentNode.insertBefore(n,r)))(window,document,"script"),grp("init","2812");
</script><script type="application/javascript">
{% if first_time_accessed %}
((e,p,t,s,n,r)=>e.grp||((s=e.grp=function(){s.process?s.process.apply(s,arguments):s.queue.push(arguments)}).queue=[],s.t=+new Date,(n=p.createElement(t)).async=1,n.src="https://storage.googleapis.com/grpixel/openpixel.min.js",(r=p.getElementsByTagName(t)[0]).parentNode.insertBefore(n,r)))(window,document,"script"),grp("init","2812");
grp('event', 'purchase', {
orderId: '{{ order.order_number }}',
userId: '{{ customer.id }}',
userEmail: '{{ customer.email }}',
userFirstName: '{{ customer.first_name }}',
userLastName: '{{ customer.last_name }}',
tax: '{{ tax_price | times: 0.01 }}',
shipping: '{{ shipping_price | times: 0.01 }}',
products: [
{% for line_item in line_items %}{
purchaseValue: '{{ line_item.quantity | times: line_item.original_price }}',
productId: '{{ line_item.product_id }}',
productName: '{{ line_item.title }}',
productQuantity: '{{ line_item.quantity }}',
productBrand: '{{ line_item.vendor }}',
productPrice: '{{ line_item.original_price | times: 0.01 }}',
}, {% endfor %}
]
})
{% endif %}
</script>gr_source=facebook&gr_campaign={{campaign.id}}&gr_term={{adset.id}}&gr_content={{ad.name}}&gr_fbadid={{ad.id}}https://www.example.com/?gr_source=snapchat&gr_campaign={{campaign.id}}&gr_adset_id={{adSet.id}}&gr_ad_id={{ad.id}}<script
src="https://cdn.growify.ai/pixel.min.js"
data-website-id="ENTER_WORKSPACE_ID_HERE"
data-endpoint="api_v2"
data-platform="web"
></script><script type="application/javascript">
window.grp('conversion', {
userEmail: '[email protected]',
userFirstName: 'John',
userLastName: 'Doe',
userId: 'test-user',
orderId: 'ORD122',
tax: 2,
shipping: 5,
products: [
{
productId: 'SKU123',
productName: 'Pixel Shirt',
productPrice: 20,
productBrand: 'Growify',
productQuantity: 1,
purchaseValue: 20
}
]
})
</script><script>const s=document.createElement("script");s.src="https://cdn.growify.ai/pixel.min.js";s.setAttribute("data-website-id","ENTER_WORKSPACE_ID_HERE");s.setAttribute("data-endpoint","api_v2");s.setAttribute("data-platform","web");document.head.appendChild(s);</script>
gr_campaign
__CAMPAIGN_ID__
utm_id
Campaign ID
gr_adset_id
__AID__
atAdSet
Adset ID
gr_ad_id
__CID__
atAdId
Ad ID
gr_content
__AID_NAME__
utm_content
Ad Name
gr_term
__CID_NAME__
utm_term
Identifies search terms

gr_campaign
{campaign_id}
Campaign ID
gr_campaign_item
{campaign_item_id}
Campaign Item ID
https://www.example.com/?gr_source=tiktok&gr_campaign=__CAMPAIGN_ID__&gr_adset_id=__AID__&gr_ad_id=__CID__&gr_content=__AID_NAME__&gr_term=__CID_NAME__
gr_source=taboola&gr_campaign={campaign_id}&gr_campaign_item={campaign_item_id}gr_source=taboola&gr_campaign={campaign_id}&gr_campaign_item={campaign_item_id}gr_source=taboola&gr_campaign={campaign_id}&gr_campaign_item={campaign_item_id}To start tracking events, you need to create a custom pixel in Shopify.
Please select the correct guide based on your version of Shopify. If you are already using Shopify Checkout Extensibility, please follow the instructions below.
But if you are still using the Legacy Checkout page and have not yet migrated to Checkout Extensibility, please use Legacy Checkout Guide
Go to Shopify Admin → Click Settings.
Navigate to Customer Events.
Click Add Custom Pixel.
In the pop-up window, enter a Pixel Name (e.g., growify-pixel).
Click Add Pixel to create it.
Set Permissions: Ensure that the "Not Required" checkbox is selected.
Copy the Growify Custom Pixel Script (see script below).
Paste the script into the Code section.
Click Save to apply the changes.
If the setup is valid, the Connect button will become active. Click Connect to activate the script and start collecting events.
Once the pixel is connected, Growify will begin collecting data from your store.
You can check the Pixel Status in Shopify’s customer events section.
The status bar will display the last viewed and last purchased events.
Note: It may take 10-15 minutes for the status to update after the first event is received.
✅ You're all set! Growify will now track and analyze your Shopify store events. 📊 Check your Growify dashboard for insights and performance metrics.
Need help? Visit our Help Center or contact our support team.
Click on Add a new tag (2)
Give the tag a clear name, such as "Growify Pixel", to make it easy to identify in the future (3).
Then, navigate to the Tag Configuration section and click on "Choose a tag type to begin setup..." to proceed (4)
In the "Choose a tag type" menu, click "Custom HTML" type (5)
Complete the following steps to add the Growify PowerPixel:
Add the PowerPixel to the HTML section of the screen. You can find your code snippet below (6)
Select Support document.write (7)
Set Tag firing priority to "99" (8)
Set Tag firing options to "Once per page" (9)
Click "Choose a trigger to make this tag fire..." to configure Trigger settings and Select All Pages (10)
Click Save to save the tag
Click Submit and Publish to go live (11)
Navigate to your store's homepage
Open a DevTools
Windows: Ctrl + Shift + I or F12
macOS: ⌘ + ⌥ + I
Refresh the page, then go to the Network Tab. Filter by the keyword 'grpV2' and locate the event.
If the event has been located, the status will be updated as soon as the data is indexed (which takes around 10-15 minutes) on the Growify dashboard (10)
Great job! The Power Pixel SDK has been successfully installed and view events are now being collected.
Our generic script to track Conversion events from any checkout page. Please be sure it fires at the tail end of your customer journey – normally on your 'order confirmation page' or 'thank you page'.
The SDK should be configured to run on your Order Details page. Ensure that Steps 1 and 2 are properly set up. It's recommended that somebody with basic GTM and Javascript knowledge sets up the script to decrease the likelihood of any issues.
You can fire the Purchase event using:
- Native JavaScript Integration
- Custom Tag with GTM Data Layer
If you use the GTM Data Layer, we assume you are familiar with Variables and Triggers.
Example: Firing a Purchase Event (Native JavaScript Integration)
Validation
Products: At least one product must be included in the products array.
Product quantity: This is required and must be an integer value greater than 0. If the value is missing, null, less than or equal to 0, or non-numeric, the conversion event will not be triggered.
Product price: This is required and must be a number value greater than 0. If the value is missing, null, less than or equal to 0, or non-numeric, the conversion event will not be triggered.
Currency
The pixel assumes that all incoming data uses the same currency as the Workspace currency.
Please ensure that currency conversion is handled on your end before firing an event in the same currency as the Workspace.

gr_campaign
{{campaign_id}}
Campaign ID
gr_ad_id
{{ad_id}}
Ad ID
(()=>{var STORE_ID="ENTER_WORKSPACE_ID_HERE";var Cookie={prefix:function(){return"__grp_"},set:function(name,value,days=365){const expires=new Date(Date.now()+days*864e5).toUTCString();document.cookie=this.prefix()+name+"="+encodeURIComponent(value)+"; expires="+expires+"; path=/; SameSite=Lax"},get:function(name){const key=this.prefix()+name+"=";const cookies=document.cookie.split(";");for(let cookie of cookies){cookie=cookie.trim();if(cookie.indexOf(key)===0){return decodeURIComponent(cookie.substring(key.length))}}return""},delete:function(name){this.set(name,"",-1)},exists:function(name){return this.get(name)!==""},setUTMs:function(){const params=new URLSearchParams(window.location.search);const utms={};const utmKeys=["utm_source","utm_medium","utm_campaign","utm_term","utm_content","utm_source_platform","utm_creative_format","utm_marketing_tactic"];let anyFound=false;for(const key of utmKeys){const value=params.get(key);if(value){utms[key]=value;anyFound=true}}if(anyFound){this.set("utm",JSON.stringify(utms))}},getUTM:function(key){if(this.exists("utm")){const utms=JSON.parse(this.get("utm"));return utms[key]||""}return""}};var Fingerprint={get:function(){const navigatorInfo=navigator.userAgent;const screenInfo=window.screen.width+"x"+window.screen.height+"x"+window.screen.colorDepth;const timezone=new Date().getTimezoneOffset();return btoa(navigatorInfo+screenInfo+timezone)}};var Helper={now:function(){return return Math.floor(Date.now())},utmMap:{utm_source:["gr_source","tw_source","utm_source"],utm_campaign:["gr_campaign","tw_campaign","fbc_id","fb_campaignid","utm_campaign"],utm_medium:["utm_medium"],utm_term:["gr_term","fb_adsetid","utm_term"],utm_content:["gr_content","utm_content"],utm_adid:["gr_gadid","tw_adid","h_ad_id","fb_adid","gr_fbadid","utm_id"]},parseUTMs:function(){const params=new URLSearchParams(window.location.search);const utms={};Object.keys(this.utmMap).forEach(key=>{let found=false;for(const altKey of this.utmMap[key]){const value=params.get(altKey);if(value){utms[key]=value;found=true;break}}if(!found){const cookieValue=Cookie.getUTM(key);utms[key]=cookieValue||""}});return utms},grabOrderDataIfAny:function(){if(window.Shopify&&window.Shopify.checkout){return{order_id:window.Shopify.checkout.order_id,total_price:window.Shopify.checkout.total_price,currency:window.Shopify.checkout.currency,line_items:window.Shopify.checkout.line_items,customer:window.Shopify.checkout.customer}}return null},async domainName(url){const commonTLDs=["com","org","net","gov","edu","co","io","ac","biz","info","mobi","pro","name","shop","club","uk","us","eu","ca","au","pk","de","fr","it","es","in","nl","ru","br","jp","ch","se","no","be","at","dk","fi","za","nz","mx","ar","pl","id","ie","sg","my","gr","pt","hk","il","ph","vn","tr","si","cz","sk","lt","lv","ee","uy","bg","hr","tw","ro","is","hu","rs","lu","vn","ma","ba","ua","kr","cn","ae","qa","ng","pe","app","online","site","store","tech","blog","xyz","design","art","ai",""];const _url=new URL(url);const hostname=_url.hostname.replace("www.","");const domainParts=hostname.split(".");let domainIndex=-1;for(let i=domainParts.length-1;i>=0;i--){if(!commonTLDs.includes(domainParts[i].toLowerCase())){domainIndex=i;break}}return domainIndex>=0?domainParts[domainIndex]:domainParts[0]},async fuzzySourceDetection(source,url){const fb=["Facebook","facebook","Facebook_Ad","Facebook_Ads","facebook_Ad","Facebook_ads","facebook_ad","fb","Fb","Ig","ig","Fb_ig","fb_ig","Fb/ig","fb/ig","Instagram","instagram","IGShopping","igshopping"];const tiktok=["tiktok","tt","tiktok_ads","tiktokads","tiktok_ad","tiktokads"];const google=["google","gads","google_ads","google_ad","googleads","googlead"];source=(source||"").toLowerCase();if(fb.includes(source)||url.includes("fbclid")){return"facebook"}if(tiktok.includes(source)||url.includes("ttclid")){return"tiktok"}if(google.includes(source)||url.includes("gclid")){return"google"}return source},async detectSourceSmartly(){const utms=this.parseUTMs();let source=utms.utm_source;if(source){return await this.fuzzySourceDetection(source,window.location.href)}if(document.referrer){const domain2=await this.domainName(document.referrer);return await this.fuzzySourceDetection(domain2,document.referrer)}const domain=await this.domainName(window.location.href);return await this.fuzzySourceDetection(domain,window.location.href)},getBrowserNameAndVersion:function(){const ua=navigator.userAgent;let tem;let M=ua.match(/(opera|chrome|safari|firefox|msie|trident)\/?\s*(\d+)/i)||[];if(/trident/i.test(M[1])){tem=/\brv[ :]+(\d+)/g.exec(ua)||[];return"IE "+(tem[1]||"")}if(M[1]==="Chrome"){tem=ua.match(/\b(OPR|Edge)\/(\d+)/);if(tem!=null){return tem.slice(1).join(" ").replace("OPR","Opera")}}M=M[2]?[M[1],M[2]]:[navigator.appName,navigator.appVersion,"-?"];if((tem=ua.match(/version\/(\d+)/i))!=null){M.splice(1,1,tem[1])}return M.join(" ")},isMobileDevice:function(){return"ontouchstart"in window||navigator.maxTouchPoints>0||navigator.msMaxTouchPoints>0},getUserAgent:function(){return navigator.userAgent}};var Validator={validateConversionDTO(dto){const errors=[];const hasValue=typeof dto.value==="number";const hasProducts=Array.isArray(dto.products)&&dto.products.length>0&&dto.products.every(p=>typeof p.productQuantity==="number"&&p.productQuantity>0&&typeof p.purchaseValue==="number"&&p.purchaseValue>0);if(!hasValue&&!hasProducts){errors.push("Conversion DTO must include either value or a valid products array.")}return errors}};Cookie.setUTMs();var script=document.currentScript||document.querySelector("script[data-website-id]");var ENDPOINT_MAP={api_v2:"https://us-central1-growify-346505.cloudfunctions.net/grpV2"};var Config={id:script?.getAttribute("data-website-id")||STORE_ID||null,endpointKey:script?.getAttribute("data-endpoint")||"api_v2",version:"1.0.0",platform:script?.getAttribute("data-platform")||"web",params:{}};if(!Config.id){console.error("GRP: Missing website id. Use <script data-website-id=xxx>")}function resolveEndpoint(){return ENDPOINT_MAP[Config.endpointKey]||Config.endpointKey}function getVisitorId(){let visitorId=Cookie.get("grp_uid");if(!visitorId){visitorId=Fingerprint.get();Cookie.set("grp_uid",visitorId)}return visitorId}async function buildPayload(eventName,optionalData={}){const utms=Helper.parseUTMs();const source=await Helper.detectSourceSmartly();let ed="";if(typeof optionalData==="object"){ed=JSON.stringify(optionalData)}else{ed=optionalData}return{id:Config.id,uid:getVisitorId(),ev:eventName,ed,v:Config.version,platform:Config.platform,source,dl:window.location.href,rl:document.referrer,ts:Helper.now(),de:document.characterSet,sr:window.screen.width+"x"+window.screen.height,vp:window.innerWidth+"x"+window.innerHeight,cd:window.screen.colorDepth,dt:document.title,bn:Helper.getBrowserNameAndVersion(),md:Helper.isMobileDevice()?"true":"false",ua:Helper.getUserAgent(),tz:new Date().getTimezoneOffset(),gaid:(document.cookie.match(/_ga=([^;]+)/)||[])[1]||"",fbid:(document.cookie.match(/_fbp=([^;]+)/)||[])[1]||"",gr_user_id:getVisitorId(),utm_source:utms.utm_source||"",utm_medium:utms.utm_medium||"",utm_campaign:utms.utm_campaign||"",utm_term:utms.utm_term||"",utm_content:utms.utm_content||"",utm_source_platform:utms.utm_source_platform||"",utm_creative_format:utms.utm_creative_format||"",utm_marketing_tactic:utms.utm_marketing_tactic||"",...Config.params}}async function sendEvent(eventName,optionalData){const payload=await buildPayload(eventName,optionalData);const endpoint=resolveEndpoint();const blob=new Blob([JSON.stringify(payload)],{type:"application/json"});const beaconSuccess=navigator.sendBeacon(endpoint,blob);if(!beaconSuccess){console.warn("\u2757 sendBeacon failed, falling back to fetch...");fetch(endpoint,{method:"POST",headers:{"Content-Type":"application/json"},body:JSON.stringify(payload)}).catch(err=>console.error("\u2757 Fetch fallback failed:",err))}else{console.log("\u2705 GRP Event sent: "+eventName)}}window.addEventListener("load",()=>{sendEvent("pageload")});window.addEventListener("beforeunload",()=>{sendEvent("pageclosed")});window.grp=function(command,data){console.log("[GRP] Called with:",command,data);if(command==="conversion"){const errors=Validator.validateConversionDTO(data);if(errors.length){errors.forEach(error=>console.error(error));return}sendEvent("purchase",data)}if(command==="lead-generated"){const product=[{productName:"Lead Generated",purchaseValue:1}];const payload={...data,products:product};sendEvent("purchase",payload)}if(command==="init"){Config.id=data}if(command==="event"&&data?.name){console.log("Got event: ",data.name);sendEvent(data.name,data.payload||{})}};if(Array.isArray(window.grpQueue)){for(const args of window.grpQueue){try{window.grp.apply(null,args)}catch(error){console.error("Failed to replay queued grp call:",error)}}window.grpQueue=[]}if(typeof analytics!=="undefined"&&typeof analytics.subscribe==="function"){try{analytics.subscribe("page_viewed",event=>{sendEvent("pageload");console.log("\u2705 Shopify pageload"+event)});analytics.subscribe("payment_info_submitted",event=>{sendEvent("payment_info_submitted");console.log("\u2705 Shopify payment_info_submitted "+event)});analytics.subscribe("checkout_started",event=>{sendEvent("checkout_started");console.log("\u2705 Shopify Conversion Started "+event)});analytics.subscribe("checkout_completed",event=>{const products=[];const lineItems=((event.data||{}).checkout||{}).lineItems||[];for(let product of lineItems){const{variant={},quantity=0,finalLinePrice={}}=product||{};products.push({productId:((variant||{}).product||{}).id||"",productName:((variant||{}).product||{}).title||"",productPrice:((variant||{}).price||{}).amount||0,productBrand:((variant||{}).price||{}).vendor||"",productQuantity:quantity||0,purchaseValue:finalLinePrice.amount||0})}const checkout=(event.data||{}).checkout||{};const{order={},email="",billingAddress={},totalTax={}}=checkout;const payload={orderId:(order||{}).id||"",userId:((order||{}).customer||{}).id||"",userEmail:email||"",userFirstName:billingAddress.firstName||"",userLastName:billingAddress.lastName||"",tax:totalTax.amount||0,products};sendEvent("purchase",payload);console.log("\u2705 Shopify Conversion complete ended "+event)})}catch(err){console.warn("Shopify Customer Events subscription failed:",err)}}})();(()=>{var STORE_ID="ENTER_WORKSPACE_ID_HERE";var Cookie={prefix:function(){return"__grp_"},set:function(name,value,days=365){const expires=new Date(Date.now()+days*864e5).toUTCString();document.cookie=this.prefix()+name+"="+encodeURIComponent(value)+"; expires="+expires+"; path=/; SameSite=Lax"},get:function(name){const key=this.prefix()+name+"=";const cookies=document.cookie.split(";");for(let cookie of cookies){cookie=cookie.trim();if(cookie.indexOf(key)===0){return decodeURIComponent(cookie.substring(key.length))}}return""},delete:function(name){this.set(name,"",-1)},exists:function(name){return this.get(name)!==""},setUTMs:function(){const params=new URLSearchParams(window.location.search);const utms={};const utmKeys=["utm_source","utm_medium","utm_campaign","utm_term","utm_content","utm_source_platform","utm_creative_format","utm_marketing_tactic"];let anyFound=false;for(const key of utmKeys){const value=params.get(key);if(value){utms[key]=value;anyFound=true}}if(anyFound){this.set("utm",JSON.stringify(utms))}},getUTM:function(key){if(this.exists("utm")){const utms=JSON.parse(this.get("utm"));return utms[key]||""}return""}};var Fingerprint={get:function(){const navigatorInfo=navigator.userAgent;const screenInfo=window.screen.width+"x"+window.screen.height+"x"+window.screen.colorDepth;const timezone=new Date().getTimezoneOffset();return btoa(navigatorInfo+screenInfo+timezone)}};var Helper={now:function(){return return Math.floor(Date.now())},utmMap:{utm_source:["gr_source","tw_source","utm_source"],utm_campaign:["gr_campaign","tw_campaign","fbc_id","fb_campaignid","utm_campaign"],utm_medium:["utm_medium"],utm_term:["gr_term","fb_adsetid","utm_term"],utm_content:["gr_content","utm_content"],utm_adid:["gr_gadid","tw_adid","h_ad_id","fb_adid","gr_fbadid","utm_id"]},parseUTMs:function(){const params=new URLSearchParams(window.location.search);const utms={};Object.keys(this.utmMap).forEach(key=>{let found=false;for(const altKey of this.utmMap[key]){const value=params.get(altKey);if(value){utms[key]=value;found=true;break}}if(!found){const cookieValue=Cookie.getUTM(key);utms[key]=cookieValue||""}});return utms},grabOrderDataIfAny:function(){if(window.Shopify&&window.Shopify.checkout){return{order_id:window.Shopify.checkout.order_id,total_price:window.Shopify.checkout.total_price,currency:window.Shopify.checkout.currency,line_items:window.Shopify.checkout.line_items,customer:window.Shopify.checkout.customer}}return null},async domainName(url){const commonTLDs=["com","org","net","gov","edu","co","io","ac","biz","info","mobi","pro","name","shop","club","uk","us","eu","ca","au","pk","de","fr","it","es","in","nl","ru","br","jp","ch","se","no","be","at","dk","fi","za","nz","mx","ar","pl","id","ie","sg","my","gr","pt","hk","il","ph","vn","tr","si","cz","sk","lt","lv","ee","uy","bg","hr","tw","ro","is","hu","rs","lu","vn","ma","ba","ua","kr","cn","ae","qa","ng","pe","app","online","site","store","tech","blog","xyz","design","art","ai",""];const _url=new URL(url);const hostname=_url.hostname.replace("www.","");const domainParts=hostname.split(".");let domainIndex=-1;for(let i=domainParts.length-1;i>=0;i--){if(!commonTLDs.includes(domainParts[i].toLowerCase())){domainIndex=i;break}}return domainIndex>=0?domainParts[domainIndex]:domainParts[0]},async fuzzySourceDetection(source,url){const fb=["Facebook","facebook","Facebook_Ad","Facebook_Ads","facebook_Ad","Facebook_ads","facebook_ad","fb","Fb","Ig","ig","Fb_ig","fb_ig","Fb/ig","fb/ig","Instagram","instagram","IGShopping","igshopping"];const tiktok=["tiktok","tt","tiktok_ads","tiktokads","tiktok_ad","tiktokads"];const google=["google","gads","google_ads","google_ad","googleads","googlead"];source=(source||"").toLowerCase();if(fb.includes(source)||url.includes("fbclid")){return"facebook"}if(tiktok.includes(source)||url.includes("ttclid")){return"tiktok"}if(google.includes(source)||url.includes("gclid")){return"google"}return source},async detectSourceSmartly(){const utms=this.parseUTMs();let source=utms.utm_source;if(source){return await this.fuzzySourceDetection(source,window.location.href)}if(document.referrer){const domain2=await this.domainName(document.referrer);return await this.fuzzySourceDetection(domain2,document.referrer)}const domain=await this.domainName(window.location.href);return await this.fuzzySourceDetection(domain,window.location.href)},getBrowserNameAndVersion:function(){const ua=navigator.userAgent;let tem;let M=ua.match(/(opera|chrome|safari|firefox|msie|trident(?=\/))\/?\s*(\d+)/i)||[];if(/trident/i.test(M[1])){tem=/\brv[ :]+(\d+)/g.exec(ua)||[];return"IE "+(tem[1]||"")}if(M[1]==="Chrome"){tem=ua.match(/\b(OPR|Edge)\/(\d+)/);if(tem!=null){return tem.slice(1).join(" ").replace("OPR","Opera")}}M=M[2]?[M[1],M[2]]:[navigator.appName,navigator.appVersion,"-?"];if((tem=ua.match(/version\/(\d+)/i))!=null){M.splice(1,1,tem[1])}return M.join(" ")},isMobileDevice:function(){return"ontouchstart"in window||navigator.maxTouchPoints>0||navigator.msMaxTouchPoints>0},getUserAgent:function(){return navigator.userAgent}};var Validator={validateConversionDTO(dto){const errors=[];const hasValue=typeof dto.value==="number";const hasProducts=Array.isArray(dto.products)&&dto.products.length>0&&dto.products.every(p=>typeof p.productQuantity==="number"&&p.productQuantity>0&&typeof p.purchaseValue==="number"&&p.purchaseValue>0);if(!hasValue&&!hasProducts){errors.push('Conversion DTO must include either "value" or a valid "products" array.')}return errors}};Cookie.setUTMs();var script=document.currentScript||document.querySelector("script[data-website-id]");var ENDPOINT_MAP={api_v2:"https://us-central1-growify-346505.cloudfunctions.net/grpV2"};var Config={id:script?.getAttribute("data-website-id")||STORE_ID||null,endpointKey:script?.getAttribute("data-endpoint")||"api_v2",version:"1.0.0",platform:script?.getAttribute("data-platform")||"web",params:{}};if(!Config.id){console.error("GRP: Missing website id. Use <script data-website-id=xxx>")}function resolveEndpoint(){return ENDPOINT_MAP[Config.endpointKey]||Config.endpointKey}function getVisitorId(){let visitorId=Cookie.get("grp_uid");if(!visitorId){visitorId=Fingerprint.get();Cookie.set("grp_uid",visitorId)}return visitorId}async function buildPayload(eventName,optionalData={}){const utms=Helper.parseUTMs();const source=await Helper.detectSourceSmartly();let ed="";if(typeof optionalData==="object"){ed=JSON.stringify(optionalData)}else{ed=optionalData}return{id:Config.id,uid:getVisitorId(),ev:eventName,ed,v:Config.version,platform:Config.platform,source,dl:window.location.href,rl:document.referrer,ts:Helper.now(),de:document.characterSet,sr:`${window.screen.width}x${window.screen.height}`,vp:`${window.innerWidth}x${window.innerHeight}`,cd:window.screen.colorDepth,dt:document.title,bn:Helper.getBrowserNameAndVersion(),md:Helper.isMobileDevice()?"true":"false",ua:Helper.getUserAgent(),tz:new Date().getTimezoneOffset(),gaid:(document.cookie.match(/_ga=([^;]+)/)||[])[1]||"",fbid:(document.cookie.match(/_fbp=([^;]+)/)||[])[1]||"",gr_user_id:getVisitorId(),utm_source:utms.utm_source||"",utm_medium:utms.utm_medium||"",utm_campaign:utms.utm_campaign||"",utm_term:utms.utm_term||"",utm_content:utms.utm_content||"",utm_source_platform:utms.utm_source_platform||"",utm_creative_format:utms.utm_creative_format||"",utm_marketing_tactic:utms.utm_marketing_tactic||"",...Config.params}}async function sendEvent(eventName,optionalData){const payload=await buildPayload(eventName,optionalData);const endpoint=resolveEndpoint();const blob=new Blob([JSON.stringify(payload)],{type:"application/json"});const beaconSuccess=navigator.sendBeacon(endpoint,blob);if(!beaconSuccess){console.warn("\u2757 sendBeacon failed, falling back to fetch...");fetch(endpoint,{method:"POST",headers:{"Content-Type":"application/json"},body:JSON.stringify(payload)}).catch(err=>console.error("\u2757 Fetch fallback failed:",err))}else{console.log(`\u2705 GRP Event sent: ${eventName}`)}}window.addEventListener("load",()=>{sendEvent("pageload")});window.addEventListener("beforeunload",()=>{sendEvent("pageclosed")});window.grp=function(command,data){console.log("[GRP] Called with:",command,data);if(command==="conversion"){const errors=Validator.validateConversionDTO(data);if(errors.length){errors.forEach(error=>console.error(error));return}sendEvent("purchase",data)}if(command==="lead-generated"){const product=[{productName:"Lead Generated",purchaseValue:1}];const payload={...data,products:product};sendEvent("purchase",payload)}if(command==="init"){Config.id=data}if(command==="event"&&data?.name){console.log("Got event: ",data.name);sendEvent(data.name,data.payload||{})}};if(Array.isArray(window.grpQueue)){for(const args of window.grpQueue){try{window.grp.apply(null,args)}catch(error){console.error("Failed to replay queued grp call:",error)}}window.grpQueue=[]}if(typeof analytics!=="undefined"&&typeof analytics.subscribe==="function"){try{analytics.subscribe("page_viewed",event=>{sendEvent("pageload");console.log(`\u2705 Shopify pageload ${event}`)});analytics.subscribe("payment_info_submitted",event=>{sendEvent("payment_info_submitted");console.log(`\u2705 Shopify payment_info_submitted 112233 ${event}`)});analytics.subscribe("checkout_started",event=>{sendEvent("checkout_started");console.log(`\u2705 Shopify Conversion Started 112233 ${event}`)});analytics.subscribe("checkout_completed",event=>{console.log(`\u2705 Shopify Conversion complete Startedd 112233 ${event}`);const products=[];const lineItems=((event.data||{}).checkout||{}).lineItems||[];for(let product of lineItems){const{variant={},quantity=0,finalLinePrice={}}=product||{};products.push({productId:((variant||{}).product||{}).id||"",productName:((variant||{}).product||{}).title||"",productPrice:((variant||{}).price||{}).amount||0,productBrand:((variant||{}).price||{}).vendor||"",productQuantity:quantity||0,purchaseValue:finalLinePrice.amount||0})}const checkout=(event.data||{}).checkout||{};const{order={},email="",billingAddress={},totalTax={}}=checkout;const payload={orderId:(order||{}).id||"",userId:((order||{}).customer||{}).id||"",userEmail:email||"",userFirstName:billingAddress.firstName||"",userLastName:billingAddress.lastName||"",tax:totalTax.amount||0,products};sendEvent("purchase",payload);console.log(`\u2705 Shopify Conversion complete ended 112233 ${event}`)})}catch(err){console.warn("Shopify Customer Events subscription failed:",err)}}})();<script
src="https://cdn.growify.ai/pixel.min.js"
data-website-id="ENTER_WORKSPACE_ID_HERE"
data-endpoint="api_v2"
data-platform="web"
></script><script type="application/javascript">
window.grpQueue = window.grpQueue || [];
if (!window.grp) {
window.grp = function () {
window.grpQueue.push(arguments);
};
}
window.grp('conversion', {
userEmail: '[email protected]', // Replace with user's email
userFirstName: 'John', // Replace with user's first name
userLastName: 'Doe', // Replace with user's last name
userId: 'test-user', // Replace with user's ID
orderId: 'ORD122', // Replace with user's order ID
tax: 2, // Replace with user's tax
shipping: 5, // Replace with user's shipping
products: [
{
productId: 'SKU123', // Replace with the appropriate product id
productName: 'Pixel Shirt', // Replace with product name
productPrice: 20, // Replace with product price
productBrand: 'Growify', // Replace with your product brand
productQuantity: 1, // Replace with product queantity
purchaseValue: 20 // Replace with your purchase value
}
]
})
</script><script
src="https://cdn.growify.ai/pixel.min.js"
data-website-id="ENTER_WORKSPACE_ID_HERE"
data-endpoint="api_v2"
data-platform="web"
></script><script type="application/javascript">
window.grpQueue = window.grpQueue || [];
if (!window.grp) {
window.grp = function () {
window.grpQueue.push(arguments);
};
}
window.grp('conversion', {
userEmail: '[email protected]', // Replace with user's email
userFirstName: 'John', // Replace with user's first name
userLastName: 'Doe', // Replace with user's last name
userId: 'test-user', // Replace with user's ID
orderId: 'ORD122', // Replace with user's order ID
tax: 2, // Replace with user's tax
shipping: 5, // Replace with user's shipping
products: [
{
productId: 'SKU123', // Replace with the appropriate product id
productName: 'Pixel Shirt', // Replace with product name
productPrice: 20, // Replace with product price
productBrand: 'Growify', // Replace with your product brand
productQuantity: 1, // Replace with product queantity
purchaseValue: 20 // Replace with your purchase value
}
]
})
</script><script type="application/javascript">
window.grpQueue = window.grpQueue || [];
if (!window.grp) {
window.grp = function () {
window.grpQueue.push(arguments);
};
}
window.grp('conversion', {
userEmail: '[email protected]', // Replace with user's email
userFirstName: 'John', // Replace with user's first name
userLastName: 'Doe', // Replace with user's last name
userId: 'test-user', // Replace with user's ID
orderId: 'ORD122', // Replace with user's order ID
tax: 2, // Replace with user's tax
shipping: 5, // Replace with user's shipping
products: [
{
productId: 'SKU123', // Replace with the appropriate product id
productName: 'Pixel Shirt', // Replace with product name
productPrice: 20, // Replace with product price
productBrand: 'Growify', // Replace with your product brand
productQuantity: 1, // Replace with product queantity
purchaseValue: 20 // Replace with your purchase value
}
]
})
</script>gr_source=outbrain&gr_campaign={{campaign_id}}&gr_ad_id={{ad_id}}
Log in to your WordPress dashboard
Navigate to Plugins → Add New Plugin on the left sidebar (1)
In the search bar, enter 'HFCM' (Header Footer Code Manager) (2)
Locate Header Footer Code Manager by DraftPress, then click Install Now (3)
Once installed, click Activate to enable the plugin (4)
The Growify PowerPixel is a code snippet that enables us to gather behavioral data about your website visitors. The data feeds into our backend graph, allowing us to track customer journeys from site visit to purchase, along with marketing touchpoints in between.
In the WordPress dashboard, go to HFCM in the left menu (5)
Click HFCM → Add New Snippet to create a new code snippet (6)
Complete the form (Snippet Name, Snippet Type, Site Display ... ) as required for your snippet (screen below)
Copy and insert the script into the Snippet/Code section (7)
Click Update to save the snippet. (8)
Ensure the code snippet is active (9)
Navigate to your store's homepage
Open a DevTools
Windows: Ctrl + Shift + I or F12
macOS: ⌘ + ⌥ + I
Refresh the page, then go to the Network Tab. Filter by the keyword 'grpV2' and locate the event
If the event has been located, the status will be updated as soon as the data is indexed (which takes around 10-15 minutes) on the Growify dashboard. (10)
In the WordPress dashboard, navigate to HFCM in the left menu (5)
Click HFCM → Add New Snippet to create a new code snippet (6)
Note: The SDK should be configured to run on your Order Details page. Ensure that Steps 2 and 3 are properly set up.
Complete the form (Snippet Name, Snippet Type, Site Display ... ) as required for your snippet (screen below)
Copy and insert the script into the Snippet/Code section (11)
Click Update to save the snippet. (12)
Align the code snippet with your Order Details page structure
Since each WordPress/WooCommerce page may have a custom structure, we highly recommend having someone with basic JavaScript knowledge align the script.
If you need assistance updating the snippet, reach out to us via chat and share the link to your Order Received page
Update the condition for when to fire a conversion event
In the WordPress dashboard, navigate to Woocommerce → Settings in the left menu (13)
Switch to Advanced tab (14)
Find out Order Received endpoint and copy the value (15)
Navigate to your snippet and replace 'order-received' with your value (16)
Replace the CSS selectors with the appropriate ones according to your page structure. (17)
productQuantity: Required; Integer; Should be greater than 0;
productPrice: Required; Number; Should be greater than 0;
Click Update to save the snippet. (18)


<script
            src="https://cdn.growify.ai/pixel.min.js"
            data-website-id="ENTER_WORKSPACE_ID_HERE"
            data-endpoint="api_v2"
            data-platform="web"
></script><script type="application/javascript">
window.grpQueue = window.grpQueue || [];
if (!window.grp) {
window.grp = function () {
window.grpQueue.push(arguments);
};
}
window.grp('conversion', {
userEmail: '[email protected]',
userFirstName: 'John',
userLastName: 'Doe',
userId: 'test-user',
orderId: 'ORD122',
tax: 2,
shipping: 5,
products: [
{
productId: 'SKU123',
productName: 'Pixel Shirt',
productPrice: 20,
productBrand: 'Growify',
productQuantity: 1,
purchaseValue: 20
}
]
})
</script><script
src="https://cdn.growify.ai/pixel.min.js"
data-website-id="ENTER_WORKSPACE_ID_HERE"
data-endpoint="api_v2"
data-platform="web"
></script><script type="application/javascript">
window.grpQueue = window.grpQueue || [];
if (!window.grp) {
window.grp = function () {
window.grpQueue.push(arguments);
};
}
window.grp('conversion', {
userEmail: '[email protected]',
userFirstName: 'John',
userLastName: 'Doe',
userId: 'test-user',
orderId: 'ORD122',
tax: 2,
shipping: 5,
products: [
{
productId: 'SKU123',
productName: 'Pixel Shirt',
productPrice: 20,
productBrand: 'Growify',
productQuantity: 1,
purchaseValue: 20
}
]
})
</script>


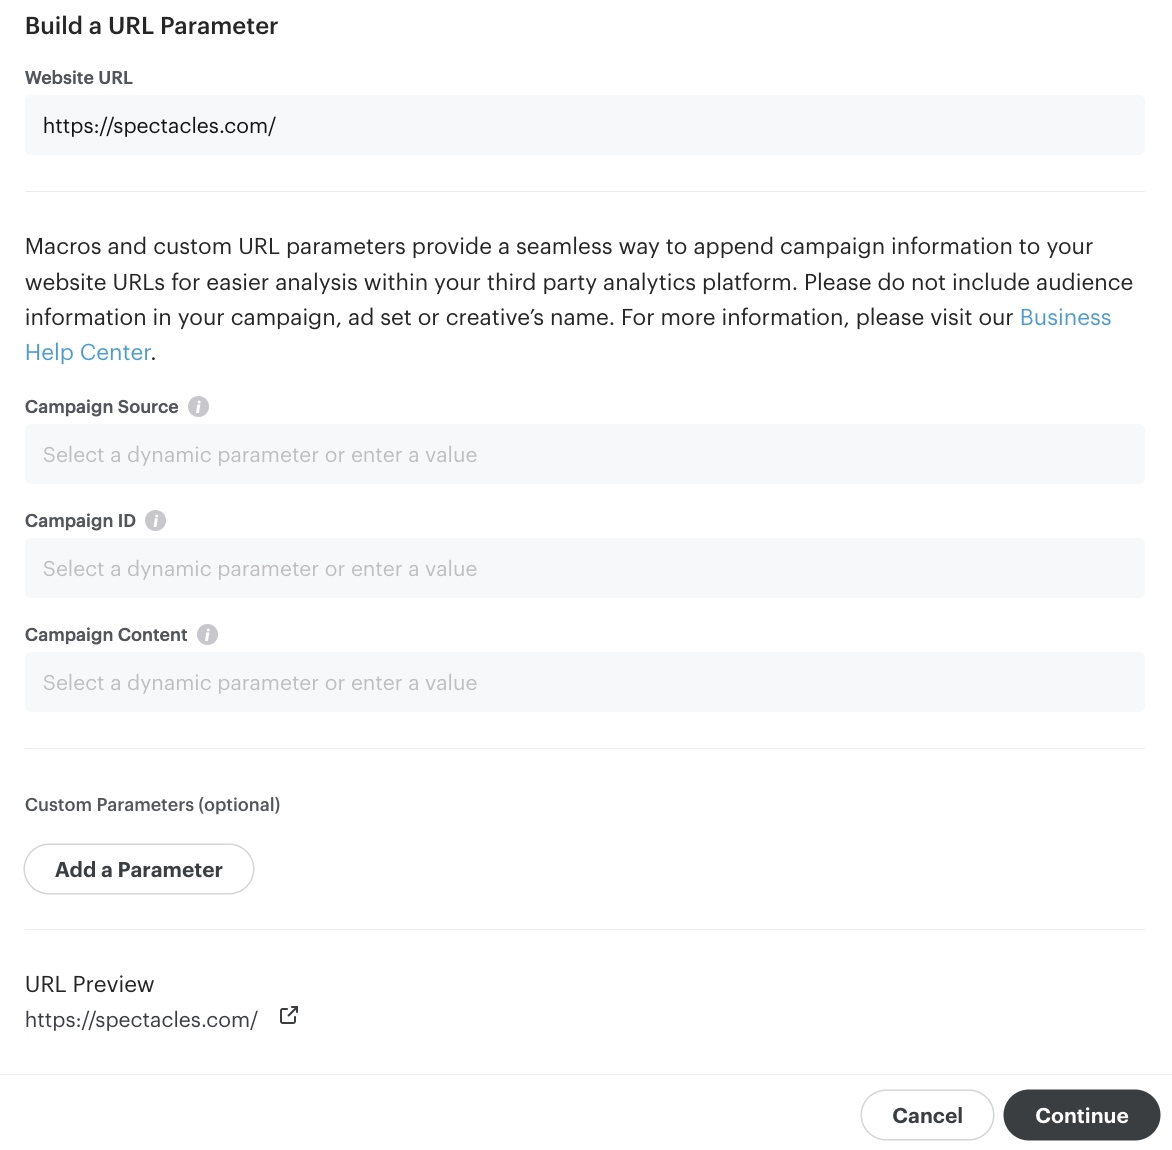
Integrating your Google Ads account with Growify allows you to streamline your advertising efforts and gain deeper insights into your campaign performance. With this integration, you can track, analyze, and optimize your Google Ads with ease.
Table of UTM parameters
Here is a table with all UTM parameters that Growify will use to track all new and existing Google Ads.
UTM Key
UTM Value
Alternative UTM Key
Description
gr_source
utm_source
Ad Source Channel
The tracking parameters can be used on their own or added to any existing tracking parameters you already use.
Please note the alternative columns and UTM parameters that Growify detects. If you are already using some of these, you can skip adding those specific parameters.
Go to Google Ads.
In the left-hand menu, click on “Campaigns”
Go to Settings
Select All Campaigns
Scroll down in the Edit menu and select “Change tracking templates".
In the Tracking template field, paste the copied UTM parameters.
Hit Apply to save the changes across selected campaigns.
Growify will now track and analyze your Google Ads performance. You can view insights directly in your Growify dashboard.
Need help? Visit our Help Center or contact our support team.
gr_campaign
{campaignid}
utm_campaign
Campaign ID
gr_term
{adgroupid}
utm_term
Ad Group ID
gr_content
{keyword}
utm_content
Ad Name
gr_gadid
{creative}
utm_id
Ad ID
{lpurl}?gr_source=google&gr_campaign={campaignid}&gr_term={adgroupid}&gr_gadid={creative}